

运维自动化之系统部署
1 系统安装过程
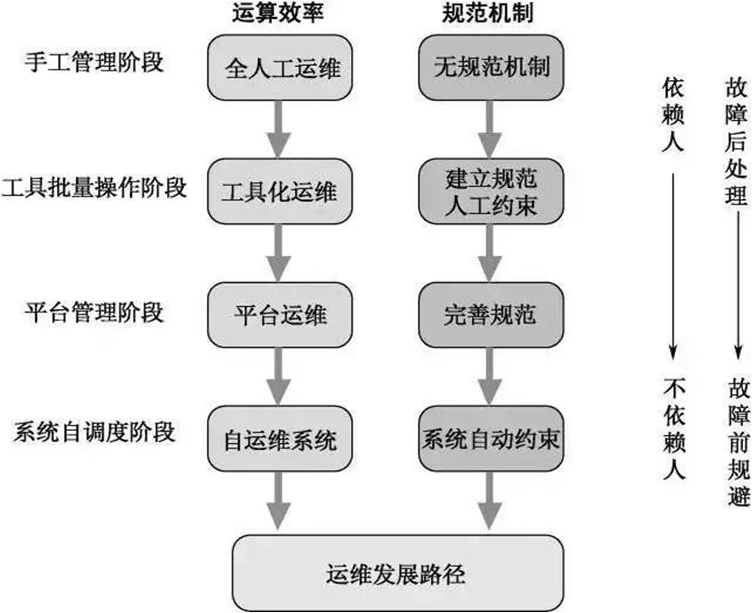
1.1 运维自动化发展历程及技术应用
1.2 系统安装过程
1. 加载boot loader(引导程序,如GRUB)
2. 加载启动安装菜单(选择安装模式等)
3. 加载内核(vmlinuz)和临时根文件系统(initrd)
4. 加载真实根系统并挂载
5. 运行Anaconda安装向导(图形/文本模式配置系统)
1.2.1 Linux安装光盘的安装相关文件
在系统光盘的isolinux目录下有和安装相关的文件
- boot.cat: 相当于grub的第一阶段
- isolinux.bin:光盘引导程序,在mkisofs的选项中需要明确给出文件路径,这个文件属于SYSLINUX项目
- isolinux.cfg:启动菜单的配置文件,当光盘启动后(即运行isolinux.bin),会自动去找isolinux.cfg文件
- vesamenu.c32:是光盘启动后的启动菜单图形界面,也属于SYSLINUX项目,menu.c32提供纯文本的菜单
- memtest:内存检测程序
- splash.png:光盘启动菜单界面的背景图
- vmlinuz:是内核映像
- initrd.img:ramfs文件
1.2.2 安装菜单的内核参数
安装光盘的启动菜单配置文件:isolinux/isolinux.cfg中设置相关的内核加载参数,实现不同的安装过程
isolinux.cfg文件中每个安装对应菜单选项:
加载内核:isolinuz/vmlinuz
向内核传递参数:append initrd=initrd.img 参数设置
指定内核参数方法
在启动菜单界面,选中一项安装方法,按tab键,在后面增加参数
在启动菜单界面,任意选中一项安装方法,按ESC键:boot: linux 参数设置
常见的内核参数:
text:默认启动GUI安装接口,可以指定文本方式的安装界面
rescue:进入救援模式
inst.repo=path:指定安装源文件的路径,可以是以下格式
CentOS 6
DVD drive repo=cdrom :device
Hard Drive repo=hd:device/path
HTTP Server repo=http://host/path
HTTPS Server repo=https://host/path
FTP Server repo=ftp://username:password@host/path
NFS Server repo=nfs:server:/path
ISO images on an NFS Server repo=nfsiso:server:/path
Centos 7 以上版本
Any CD/DVD drive   inst.repo=cdrom
Hard Drive inst.repo=hd:device:/path
HTTP Server inst.repo=http://host/path
HTTPS Server inst.repo=https://host/path
FTP Server inst.repo=ftp://username:password@host/path
NFS Server inst.repo=nfs:[options:]server:/path
askmethod:选择安装源文件的获取方法,提供了光盘,本地硬盘,NFS,FTP,HTTP多种安装源,此项Centos 7 以后版已废弃
ks=path: 指定自动化安装应答文件路径
initrd=initrd.img inst.ks=http://10.0.0.8/ksdir/centos8.cfg1.2.3 anaconda安装向导
anaconda是Linux系统安装程序,可以提供两种风格的安装界面
- gui:图形窗口
- tui:基于图形库curses的文本窗口
anaconda工作过程
键盘类型
时区和时间
安装源文件路径
选定要安装的程序包
安装目标存储设备及分区设置
Basic Storage:本地磁盘
特殊设备:iSCSI
KDUMP功能
设定主机名和配置网络接口
安全策略
管理员密码
创建一个普通用户
anaconda的配置方式:
- 交互式配置方式
- 通过读取事先给定的配置文件自动完成配置,加内核参数:ks=/path实现指明kickstart文件的位置,各种路径格式如下:
DVD drive: ks=cdrom:/PATH/TO/KICKSTART_FILE
Hard drive: ks=hd:device:/directory/KICKSTART_FILE
HTTP server: ks=http://host:port/path/to/KICKSTART_FILE
FTP server: ks=ftp://host:port/path/to/KICKSTART_FILE
HTTPS server: ks=https://host:port/path/to/KICKSTART_FILE
NFS server:ks=nfs:host:/path/to/KICKSTART_FILE
范例:用boot光盘启动利用网络源安装
[root@centos8 ~]#dnf -y install httpd
[root@centos8 ~]#systemctl enable --now httpd
[root@centos8 ~]#mkdir /var/www/html/centos/8/ -p
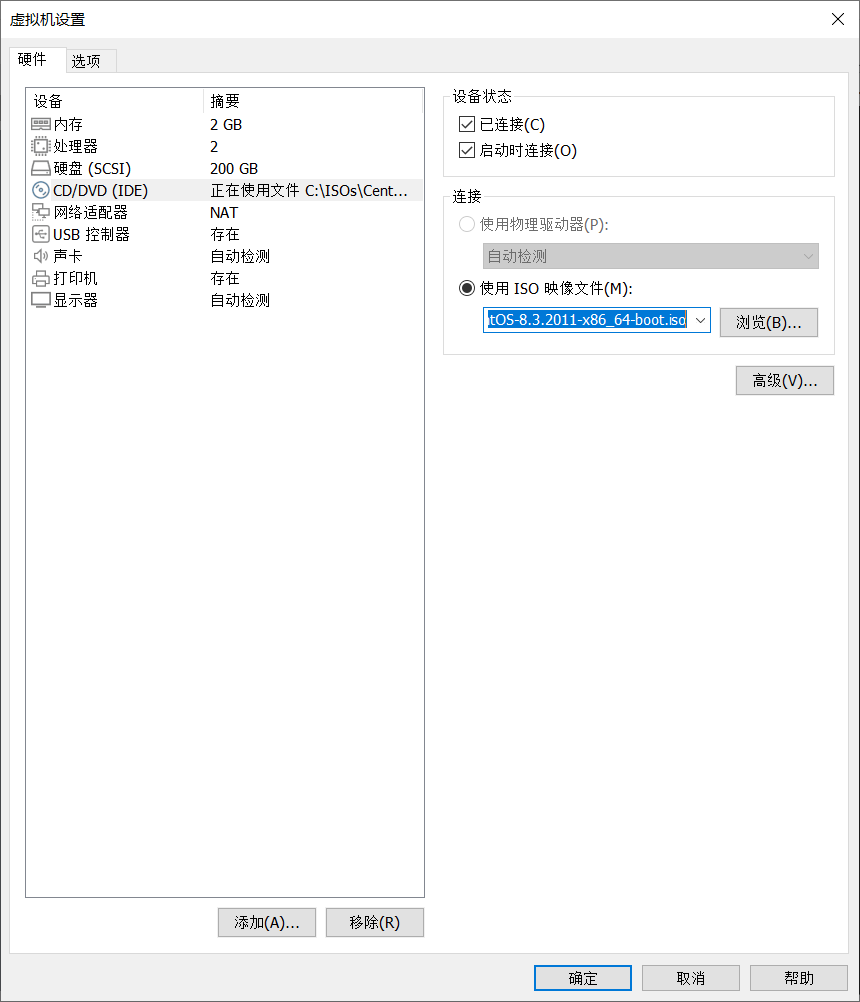
[root@centos8 ~]#mount /dev/sr0 /var/www/html/centos/8/创建新的虚拟机,关联 CentOS-8.3.2011-x86_64-boot.iso文件到光驱,配置如下:
2 自动安装的应答文件
2.1 kickstart文件使用过程
实现自动安装前,需要制作对应的安装应答文件,称为kickstart文件,用于保存安装过程需要指定的选项。
创建一个 Kickstart 文件。您可以手动写入该文件,复制手动安装后保存的 Kickstart 文件,或者使用在线生成器工具创建该文件,之后再编辑该文件。
在可移动介质、硬盘或者使用 HTTP(S)、FTP 或者 NFS 服务器的网络位置中让安装程序使用 Kickstart 文件。
创建用来开始安装的引导介质。
使安装源可供安装程序使用。
使用引导介质和 Kickstart 文件开始安装
2.2 kickstart文件的格式
2.2.1 Kickstart文件格式官方说明
https://access.redhat.com/documentation/zh-cn/red_hat_enterprise_linux/8/html/performing_an_advanced_rhel_installation/kickstart-installation-basics_installing-rhel-as-an-experienced-user#automated-installation-workflow_kickstart-installation-basics
https://access.redhat.com/documentation/en-us/red_hat_enterprise_linux/7/html/selinux_users_and_administrators_guide/index
https://access.redhat.com/documentation/en-us/red_hat_enterprise_linux/6/html/installation_guide/s1-kickstart2-options
2.2.2 kickstart文件格式说明
kickstart文件主要包括三个部分:命令段,程序包段,脚本段
程序包段:指定安装系统类型(桌面,最小化)和常用软件
%packages
@^environment group		#指定环境包组,如:@^minimal-environment
@group_name			    #软件包组
package				    #软件
-package
%end
脚本段:指定安装系统前后需要执行脚本或者命令
注意:
CentOS 8,7,6 不同版本的kickstart文件格式不尽相同,不可混用
%addon, %packages, %onerror, %pre,%post 必须以%end结束,否则安装失败
范例:CentOS 8 的最小化安装kickstart文件
ignoredisk --only-use=sda
zerombr
text
reboot
selinux --disabled
firewall --disabled
keyboard --vckeymap=us --xlayouts='us'
lang en_US.UTF-8
rootpw --plaintext 123456
firstboot --enable
skipx
timezone Asia/Shanghai --isUtc --nontp

network  --bootproto=static --device=eth0 --gateway=10.0.0.1 --ip=10.0.0.108 --nameserver=233.5.5.5 --netmask=255.255.255.0 --ipv6=auto --activate
network  --hostname=centos8

url --url=http://10.0.0.8/centos8/

clearpart --all --initlabel
part / --fstype="xfs" --ondisk=sda --size=102400
part /data --fstype="xfs" --ondisk=sda --size=51200
part swap --fstype="swap" --ondisk=sda --size=2048
part /boot --fstype="ext4" --ondisk=sda --size=1024

services --disabled="chronyd"
%packages
@^minimal-environment
kexec-tools
%end
%addon com_redhat_kdump --enable --reserve-mb='auto'
%end

%anaconda
pwpolicy root --minlen=6 --minquality=1 --notstrict --nochanges --notempty
pwpolicy user --minlen=6 --minquality=1 --notstrict --nochanges --emptyok
pwpolicy luks --minlen=6 --minquality=1 --notstrict --nochanges --notempty
%end

%post
useradd test
echo 123456 | passwd --stdin test &> /dev/null
%end
范例:CentOS 7 的最小化安装kickstart文件
install
keyboard 'us'
rootpw --plaintext 123456
lang en_US
auth  --useshadow  --passalgo=sha512
text
firstboot --disable
selinux --disabled
firewall --disabled
reboot

network  --bootproto=static --device=eth0 --gateway=10.0.0.1 --ip=10.0.0.107 --nameserver=223.5.5.5 --netmask=255.255.255.0
network  --hostname=centos7
timezone Asia/Shanghai --isUt

url --url="http://10.0.0.8/centos7"

bootloader --location=mbr
zerombr
clearpart --all --initlabel
part /boot --fstype="xfs" --size=1024
part swap --fstype="swap" --size=1024
part / --fstype="xfs" --size=102400

%post --interpreter=bash
useradd test
echo 123456|passwd --stdin test
%end

%packages
@^minimal
@core
%end
范例:CentOS 6 的最小化安装kickstart文件
install
text
reboot
lang en_US.UTF-8
keyboard us
rootpw --plaintext 123456
firewall --disabled
authconfig --enableshadow --passalgo=sha512
selinux --disabled
timezone Asia/Shanghai
bootloader --location=mbr --driveorder=sda --append="crashkernel=auto rhgb quiet"

network  --bootproto=static --device=eth0 --gateway=10.0.0.1 --ip=10.0.0.106 --nameserver=233.5.5.5 --netmask=255.255.255.0 --ipv6=auto --activate
network  --hostname=centos6

url --url=http://10.0.0.8/centos6/

zerombr
clearpart --all --initlabel
part /boot --fstype=ext4 --size=1024
part / --fstype=ext4 --size=50000
part /data --fstype=ext4 --size=30000
part swap --size=2048

%packages
@core
@server-policy
@workstation-policy
autofs
vim-enhanced
%end

%post
useradd test
echo 123456 | passwd --stdin test &> /dev/null
%end
2.3 kickstart文件创建
创建kickstart文件的方式
可使用创建工具:system-config-kickstart ,注意:此方法 CentOS 8 不再支持
依据某模板修改并生成新配置,CentOS安装完后,会自动参考当前系统的安装过程,生成一个kickstart文件 /root/anaconda-ks.cfg
检查ks文件的语法错误:
使用 ksvalidator 工具可以检查kickstart的文件格式是否有语法错误,来自于 pykickstart 包
格式:
ksvalidator /PATH/TO/KICKSTART_FILE示例:利用 system-config-kickstart 工具生成 kickstart 应答文件
#提前准备
#yum install -y system-config-kickstart
#打开Xmanager - Passive
#export DISPLAY=10.0.0.166:0.0   #IP在windows中查询Vmnet8的地址
#yum -y install firefox libglvnd-glx && yum -y groupinstall Fonts
#system-config-kickstart
1. Basic Configuration
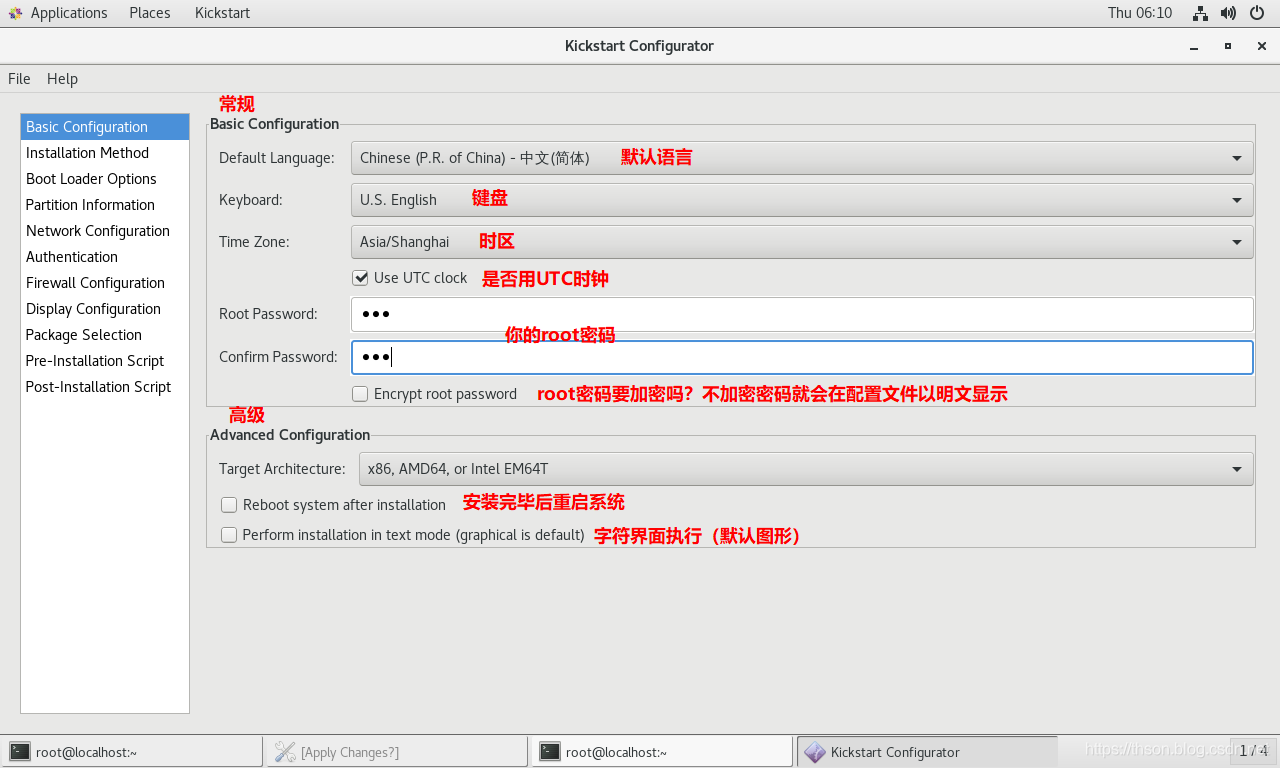
配置文件如下
┌────────────────────────────────────────────────────────┐
│#Basic Configuration
│========================================================
│#platform=x86, AMD64, or Intel EM64T
│#Default Language默认语言
│lang en_US
│# Keyboard 键盘
│keyboard 'us'
│# timezone 时区(勾选了"Use UTC clock" 会追加[--isUtc])
│timezone Asia/Shanghai
│# Root password
│rootpw --iscrypted $1$DBk7xfJp$Agxd303XUAfRKIf7gB8DG/
└──────────────────────────────────────────────────────────┘
┌────────────────────────────────────────────────────────┐
│#Advanced Configuration
│勾选就有,不勾没有
│========================================================
│# Reboot after installation
│reboot
│# Use text mode install
│text
└────────────────────────────────────────────────────────┘
2. Installation Method
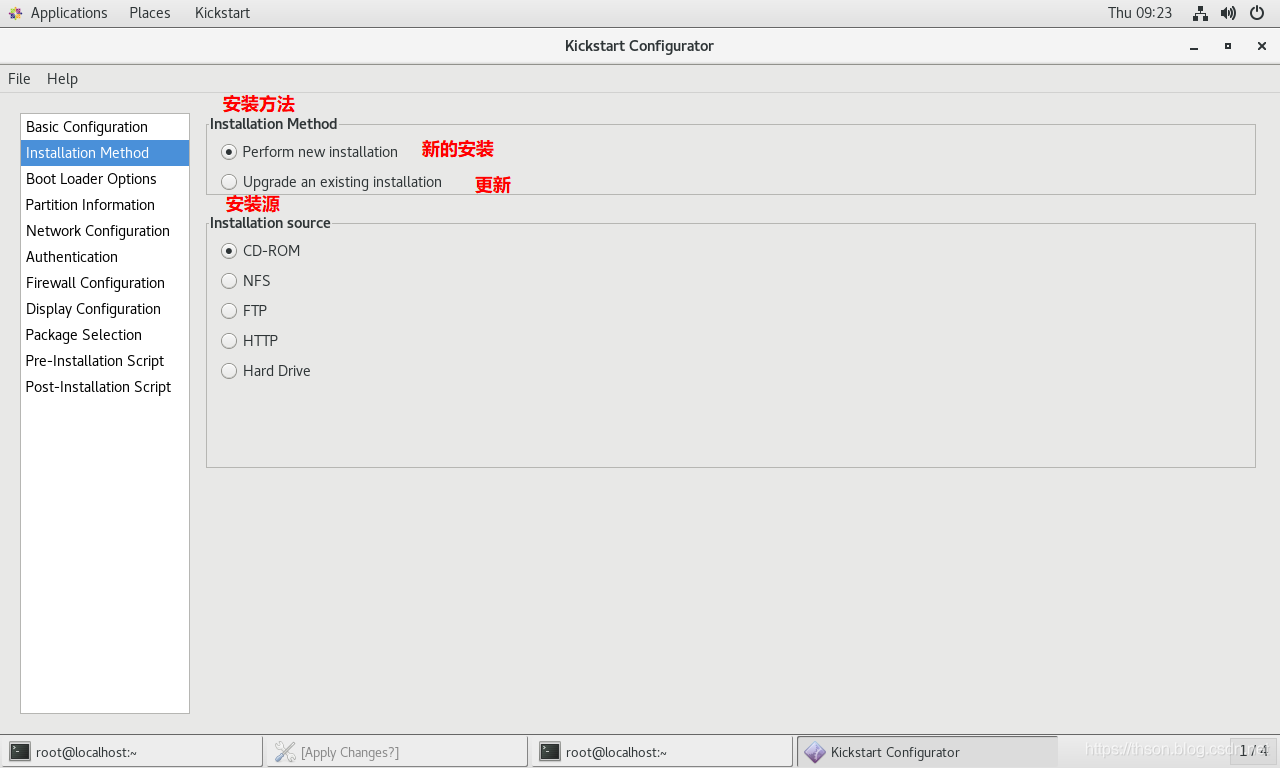
配置文件如下
┌────────────────────────────────────────────────────────┐
│#Installation Method
│========================================================
│# Install OS instead of upgrade
│install
│# Upgrade existing installation
│upgrade
└────────────────────────────────────────────────────────┘
┌────────────────────────────────────────────────────────┐
│#Installation source
│选了哪项就写哪项
│========================================================
│# Use CDROM installation media
│cdrom
│# Use NFS installation media
│nfs --server=服务器 --dir=目录
│# Use network installation
│url --url="ftp://用户名:密码@服务器/目录"
│# Use network installation
│url --url="http://服务器/目录"
│# Use hard drive installation media
│harddrive --dir=目录 --partition=分区
└────────────────────────────────────────────────────────┘
3. Boot Loader Options
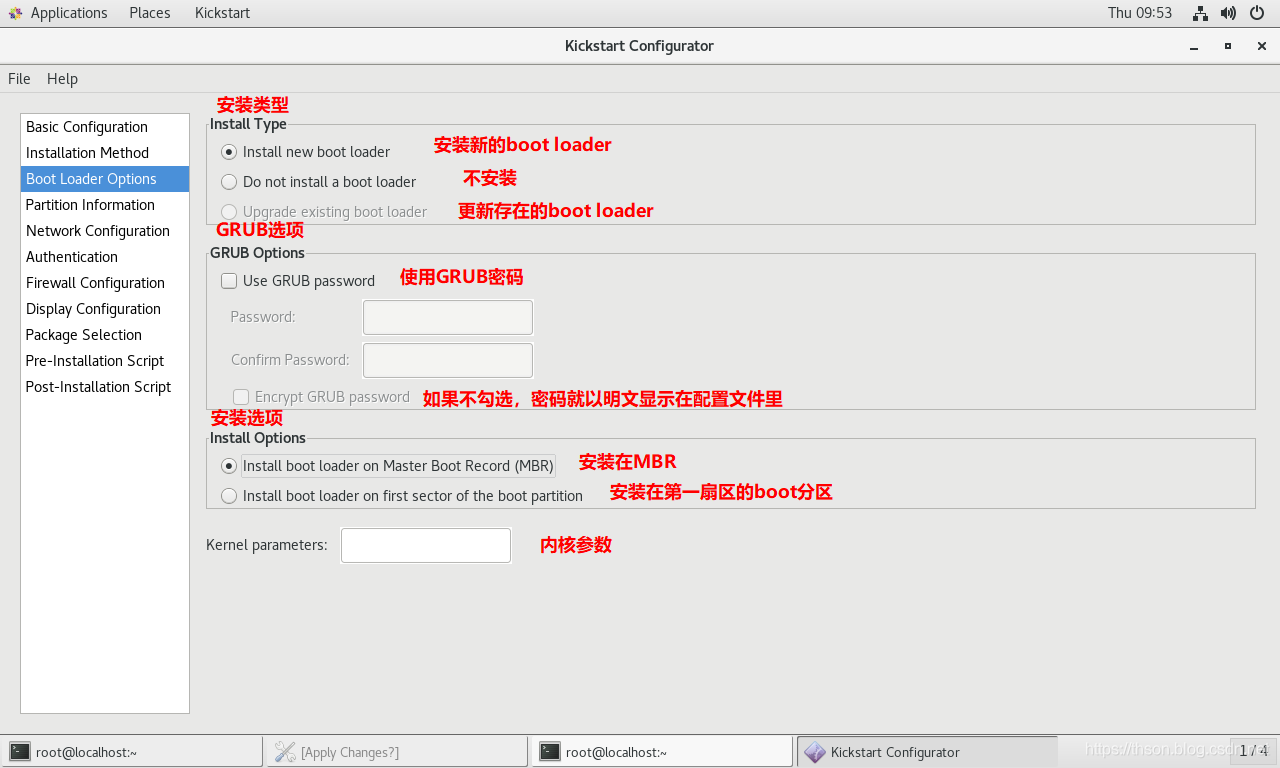
配置文件如下
┌────────────────────────────────────────────────────────────────┐
│#Installation Method&GRUB options&Install Options
│=================================================================
│ ┌────────────────────────────────────┐
│ │ 选择了Do not install a boot loader │
│ └────────────────────────────────────┘
│ # System bootloader configuration
│ bootloader --location=none
│
│ ┌────────────────────────────────────┐
│ │   选择了install new boot loader     │
│ └────────────────────────────────────┘
│ bootloader --append="ker" --location=mbr --password="123"
│#append是内核参数,location是bootloader安装位置,password是GRUB密码
└────────────────────────────────────────────────────────────────┘
4. Partition Information
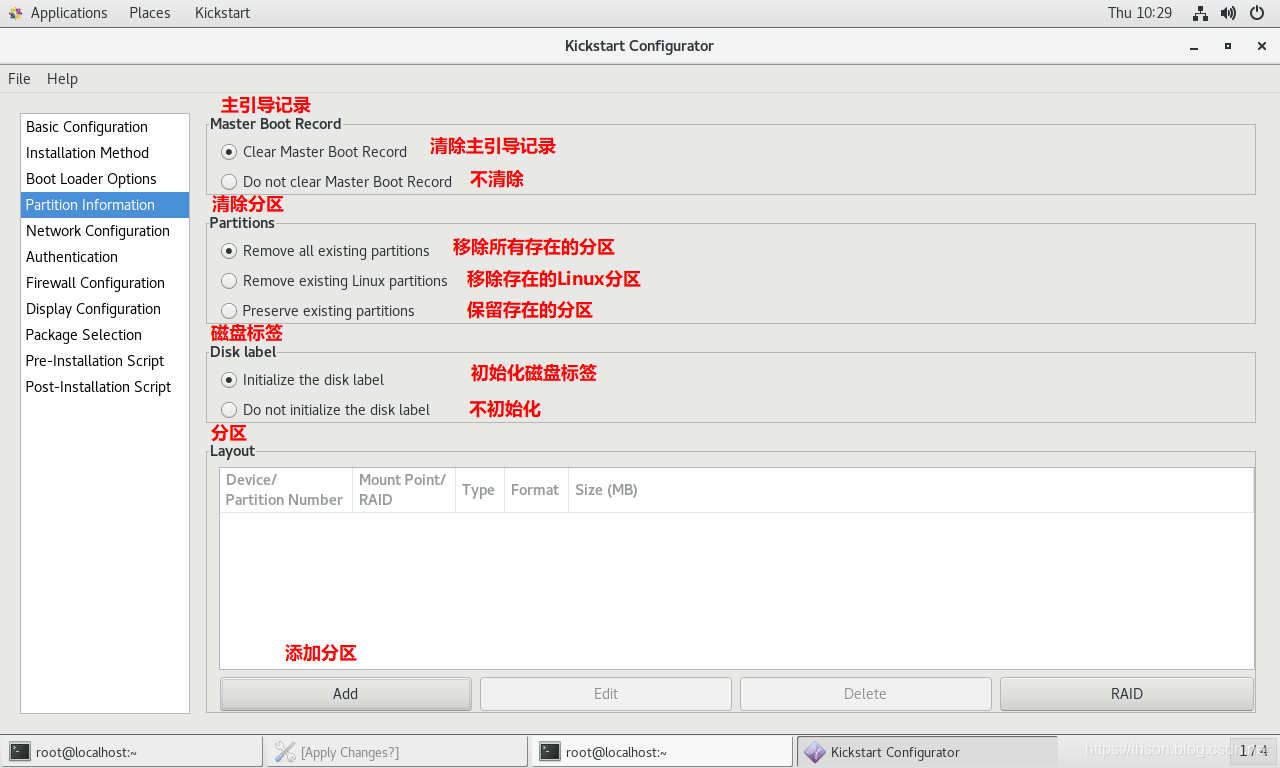
配置文件如下
┌─────────────────────────────────────────────────────┐
│# Master Boot Record
│#Master Boot Record选择了clear... 否则就没有
│======================================================
│# Clear the Master Boot Record
│zerombr
└─────────────────────────────────────────────────────┘
┌─────────────────────────────────────────────────────┐
│# Partitions&Disk Label
│======================================================
│# Partition clearing information
│clearpart --linux --initlabel
└─────────────────────────────────────────────────────┘
┌─────────────────────────────────────────────────────┐
│# Layout 分区
│part 挂载点   --fstype=文件系统  --size=大小(单位M)
│======================================================
│# Disk partitioning information
│part / --fstype="xfs" --size=10240
│part /boot --fstype="ext4" --size=1024
│part swap --fstype="swap" --size=2048
└─────────────────────────────────────────────────────┘
5. Network Configuration
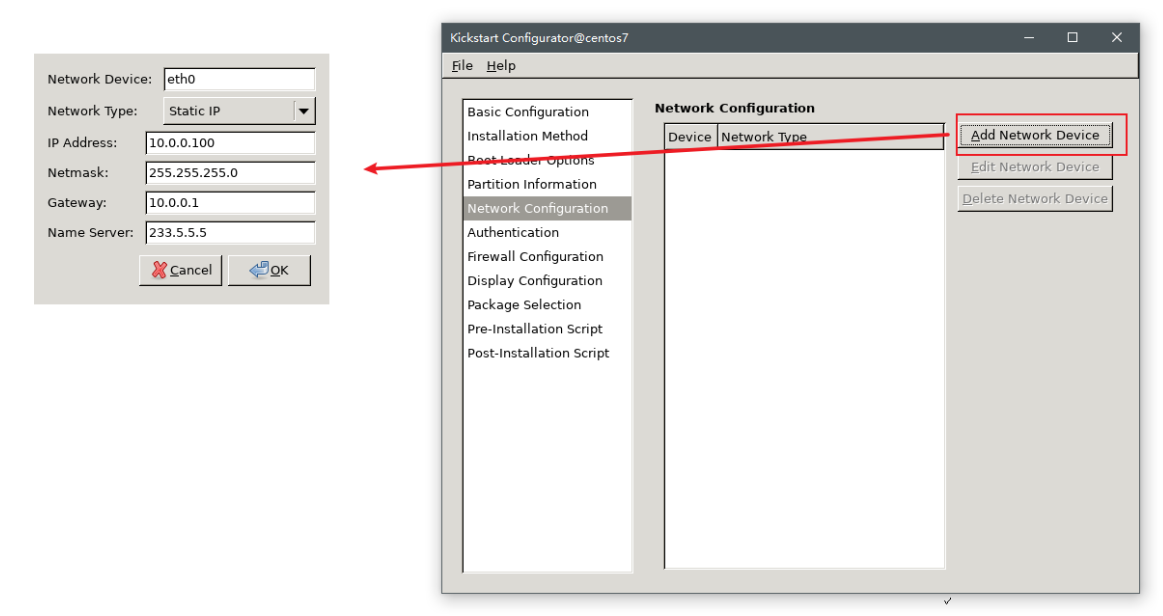
配置文件如下
┌─────────────────────────────────────────────────────┐
│# Network Configuration
│Centos7如果要写eth0,要加内核参数net.ifnames=0
│======================================================
│# Network information
│network  --bootproto=dhcp --device=eth0
└─────────────────────────────────────────────────────┘
6. Authentication
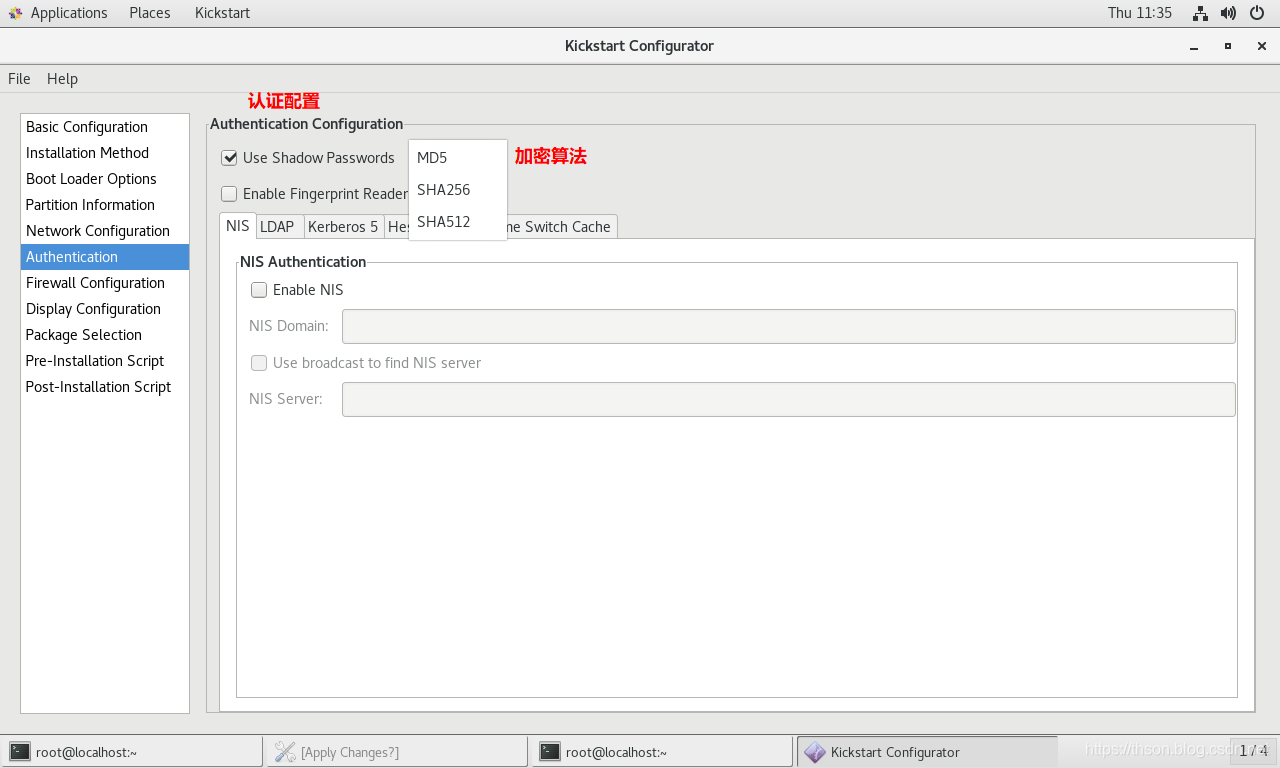
配置文件如下
┌───────────────────────────────────────────────────────────────┐
│# Authentication
│如果勾选Enable Fingerprint reader则追加参数 --enablefingerprint
│===============================================================
│# System authorization information
│auth  --useshadow  --passalgo=md5
└───────────────────────────────────────────────────────────────┘
7. Firewall Configuration
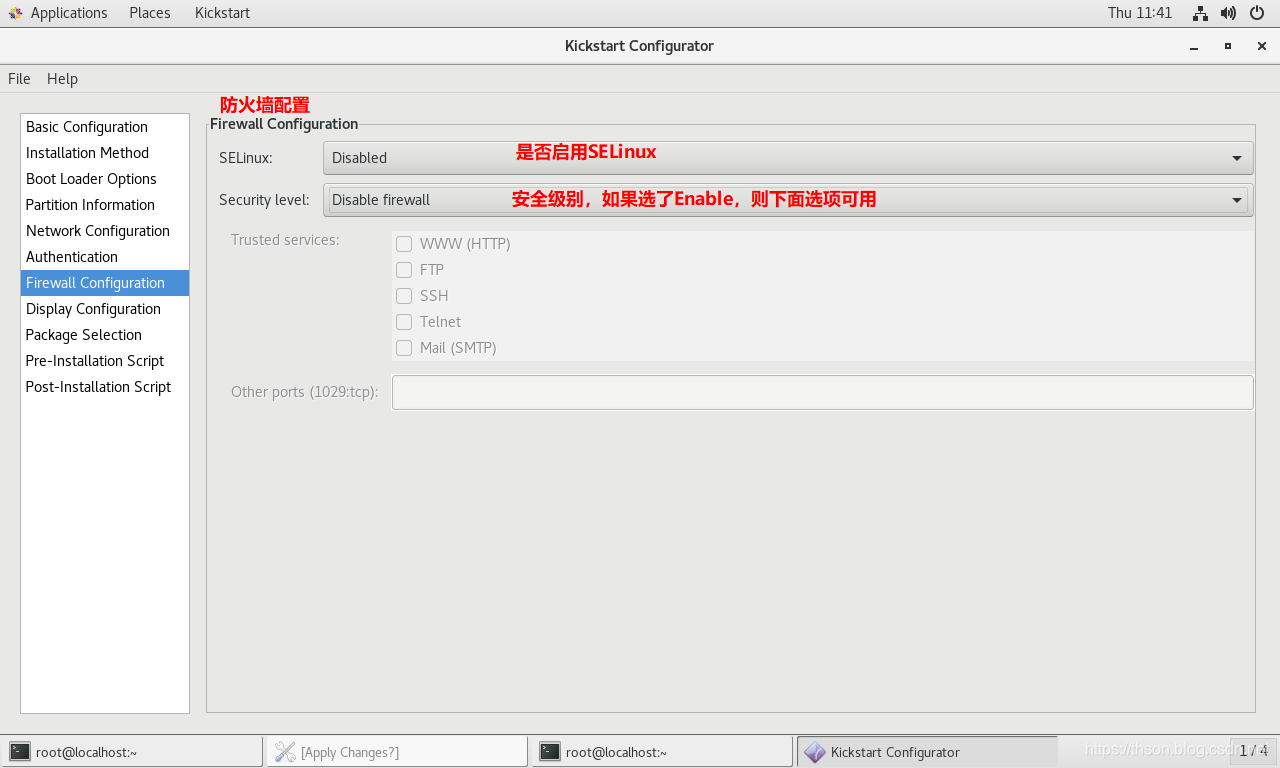
配置文件如下
┌───────────────────────────────────────────────────────────────┐
│# Firewall Configuration
│===============================================================
│# SELinux configuration
│selinux  --disabled或permissive或enforcing
│
│# Firewall configuration
│firewall  --disabled或enabled
│#如果是enable,可以在追加:--http --ftp --telnet --smtp --ssh
│#还可以追加端口:--port=555:tcp,444:udp
└───────────────────────────────────────────────────────────────┘
8. Display Configuration
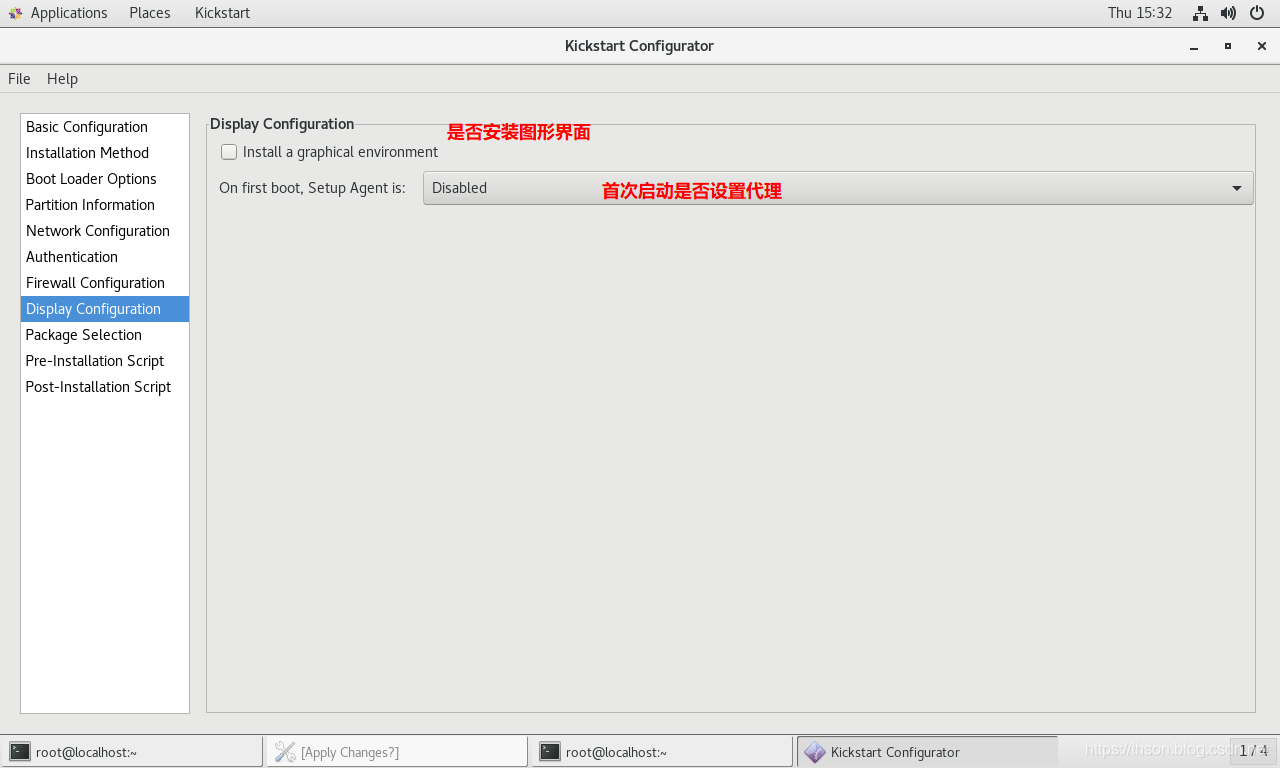
配置文件如下
┌───────────────────────────────────────────────────────────────┐
│# Display Configuration
│===============================================================
│如果选了安装图形界面,就没有下面这句话
│# Do not configure the X Window System
│skipx
│# Run the Setup Agent on first boot
│firstboot --enable或disable
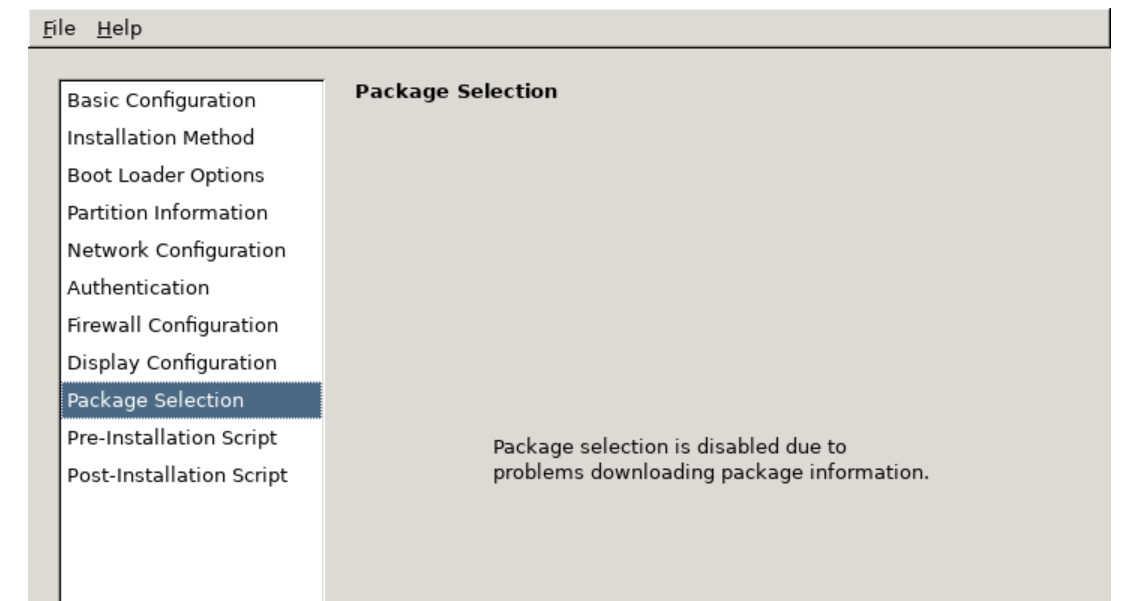
└───────────────────────────────────────────────────────────────┘9. Package Selection
说明:centos 7 选择安装软件包需要修改本地的yum仓库[base] 改为 [development],把配置的文件保存重新打开

[root@centos ~]#vim /etc/yum.repos.d/***.repo
[development]
#把原来"[]"内的内容改成development,其它不变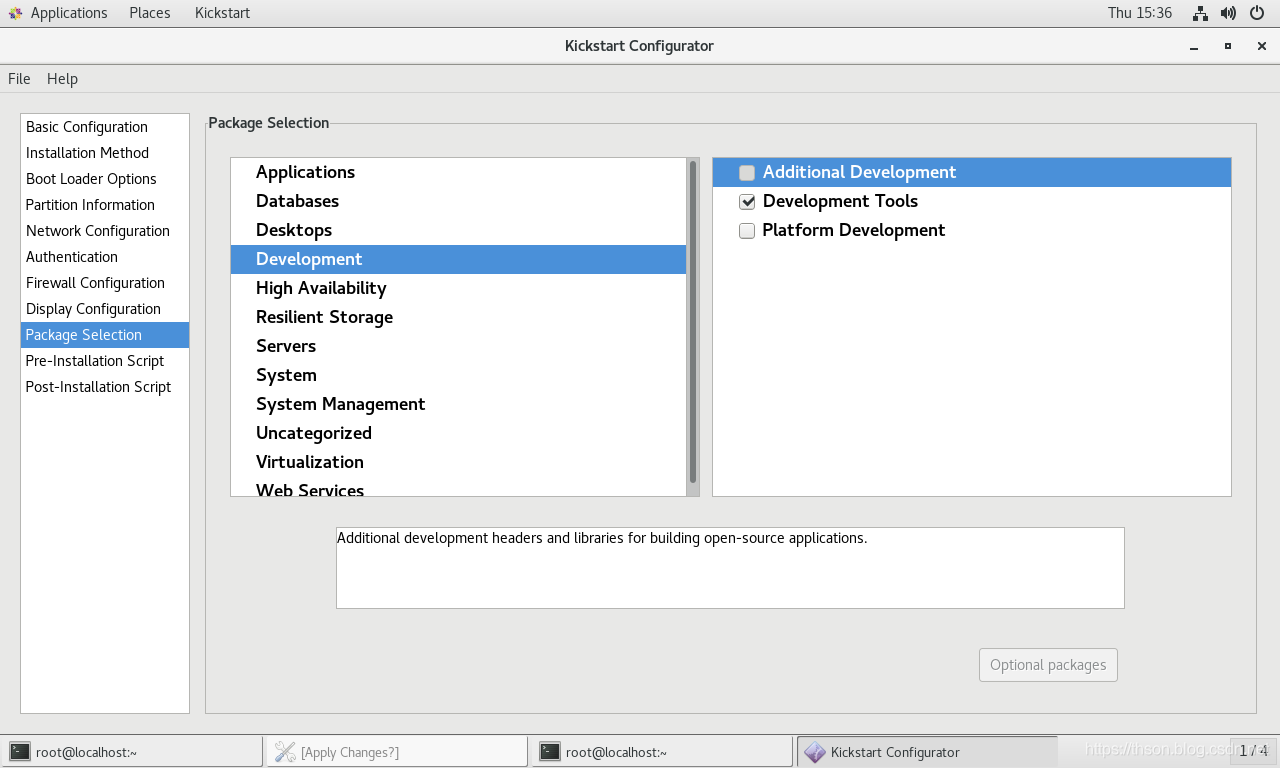
配置文件如下
%packages
@development
-byacc
-cscope
-ctags
-diffstat
-doxygen
-elfutils
-gcc-gfortran
-git
-indent
-intltool
-patchutils
-rcs
-subversion
-swig
-systemtap
%end
10. Pre-Installation Script
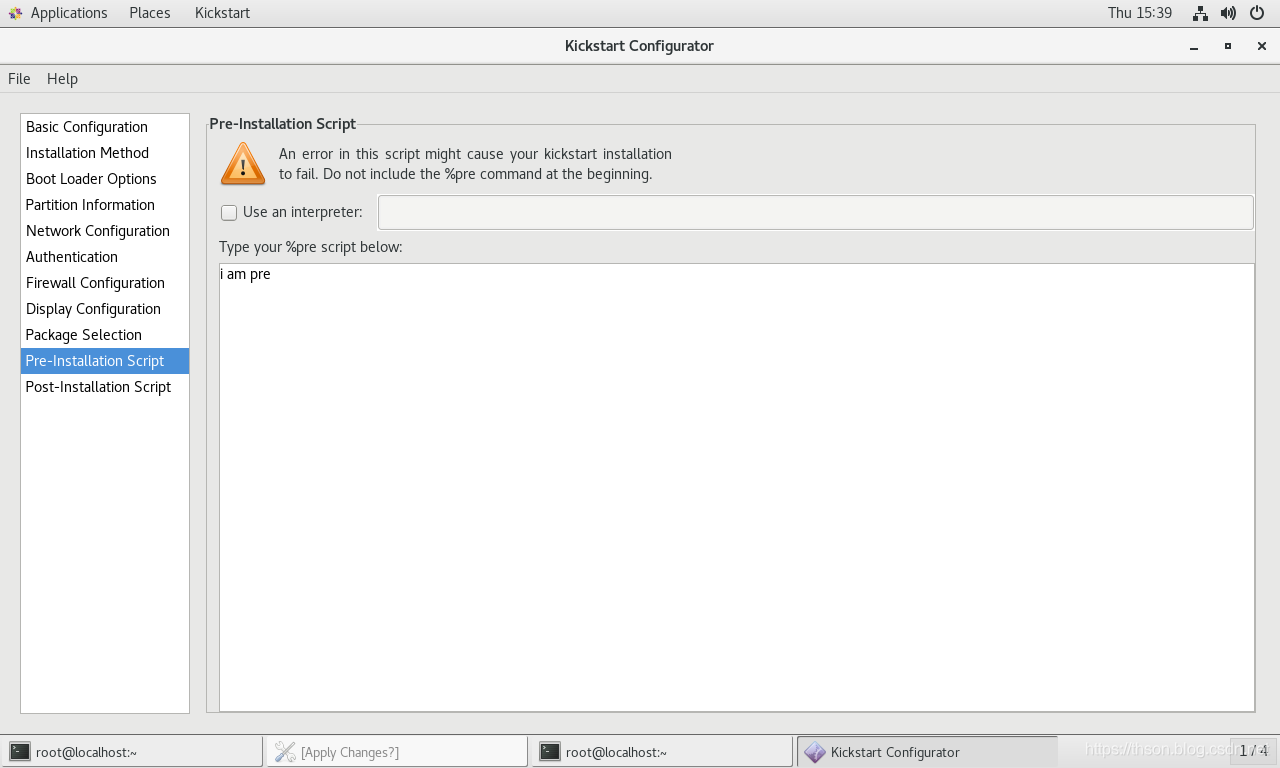
配置文件如下
%pre
echo i am pre
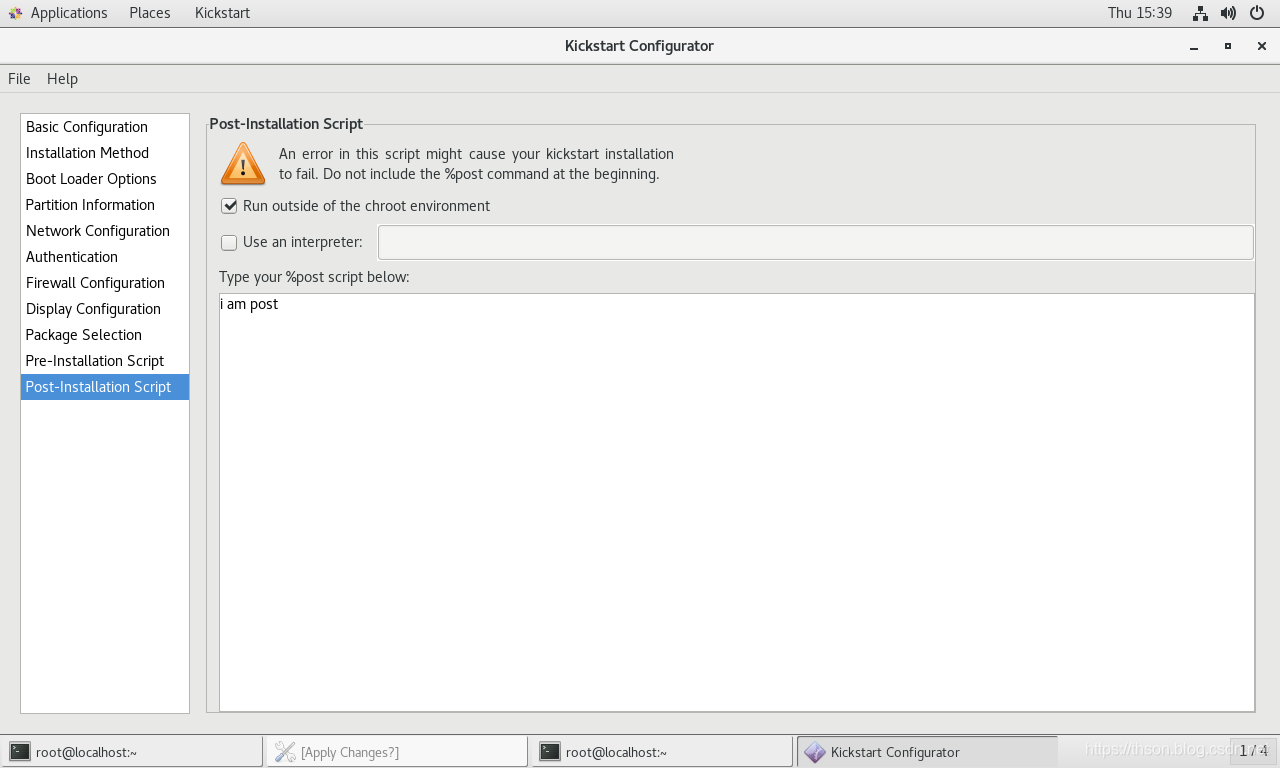
%end11. Post-Installation Script
useradd xiaom
echo 123456 | passwd --stdin xiaom
mkdir /root/.ssh -m 700
cat > /root/.ssh/authorized_keys << EOF
ssh-rsa AAAAB3NzaC1yc2EAAAADAQABAAABAQDeljlYpc58lj9SjRmB2kzuY5F6lmnYr5D5yYHo0vUg/ym9+86kiTn67qGwaQMsTGO2LfstaPkph97dW5u8ulay7idETT1KUTmhBg/HJpGPeZOi904tS+QkcziLOz0QNl5wQGgRBM6foBGQrpz+UsD8CBA/uRCVnXOozUxHCCiyz3vsnFG+GwCdzhKSF3Z/k/xOQn2Kc+z+9H+fqaa2RAJuSnmPRnIbku6p5YP2XR98DF9/85VRsVwC8arWs2M35EN7AkT8d0RU9lV8F9RYBnHtlvWJ4RzgpNn9I74Jpl6uBNIZbmOWKVkKZr2byJa04FDklS5cfqcOw2xkcTxMbd1x root@centOS7.9
EOF
chmod 600 /root/.ssh/authorized_keys
配置文件如下
%post --nochroot
echo i am post
%end
12 以上system-config-kickstart 执行后最终生成的kickstart文件如下
#platform=x86, AMD64, 或 Intel EM64T
#version=DEVEL
# Install OS instead of upgrade
install
# Keyboard layouts
keyboard 'us'
# Root password
rootpw --iscrypted $1$yfH5LeHA$VQxvkFT1zhFsnyVlXWoAE0
# System language
lang en_US
# System authorization information
auth --useshadow --passalgo=sha512
# Use text mode install
text
firstboot --disable
# SELinux configuration
selinux --disabled
# Firewall configuration
firewall --disabled
# Network information
network --bootproto=static --device=eth0 --gateway=192.168.3.1 --ip=192.168.3.88 --nameserver=233.5.5.5 --netmask=255.255.255.0
# Reboot after installation
reboot
# System timezone
timezone Asia/Shanghai
# Use network installation
url --url="http://192.168.3.7/centos"
# System bootloader configuration
bootloader --append="net.ifnames=0" --location=mbr
# Clear the Master Boot Record
zerombr
# Partition clearing information
clearpart --all --initlabel
# Disk partitioning information
part /boot --fstype="xfs" --size=1024
part / --fstype="xfs" --size=102400
part swap --fstype="xfs" --size=1024
%post --interpreter=bash
#创建用户
useradd zhou
#给用户设置密码
echo 123456 | passwd --stdin zhou
#创建一个目录并设置权限700
mkdir /root/.ssh -m 700
#写入目标主机公钥信息,安装完成后,目标主机可直接登录此机器
cat > /root/.ssh/authorized_keys <<EOF
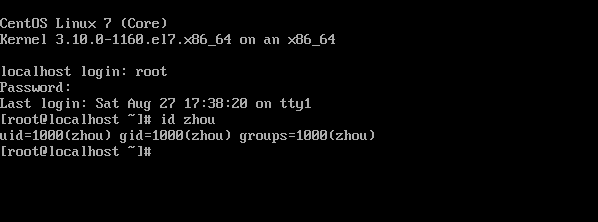
ssh-rsa AAAAB3NzaC1yc2EAAAADAQABAAABgQCbLa4m4FZZGuPX0CMhkTmQTfNSFjeZcbfvLl3KYI60zMmr4T8Us8u6pFgI5BqeoVpzdvKL4/O0qxfBnfdprPWP24JQMds9pYMl/fbyq42W9PjOclVaETzlHCuLuMuFX9910v5bsAxAID9ko4CuWm2WPQwXiSD8C+Z/sWbwiygZIq+H4zDQN6RwKI2pox7VnKiS3b0OPjW5gbJyBs+xXHrogW8GvM/YDkq9nJ7AkIHKWYFDMpkoS0RytU8YyQjZbwtj7K1JIvek/yMg6FpzhnQTnBmokdFfEVvY1/TK8foDBLOreYlT1fBYUa4bFozm5yfGuDG6pyZIKWjb6jz25E17zlgIiaFaFLytUQ/ACY6vvksp0ajR94upnaOwQa4avUV+skaZ5qJJCokuGCVIUx4RTR4KuQG8JyjhK/70q2qqeyTVXMvem7sw0bcRYKw2kJMo10Fpb/6tnuH53s2C4IXGnDHi2TitCYx5aF8C0S8xN0/mpJr7r6R5fAwaGOLoN7M= root@Rocky8
EOF
#设置权限
chmod 600 /root/.ssh/authorized_keys
%end
%packages
@ha
@web-server
-fence-agents-aliyun
-fence-agents-all
-fence-agents-aws
-fence-agents-azure-arm
-fence-agents-gce
-omping
-pacemaker-doc
-pcs
%end第二步:创建新的虚拟机,设置连接镜像启动;安装菜单界面按 ESC 设置内核参数,指定应答文件地址
linux ks=http://10.0.0.27/kicst/ks4.cfg net.ifnames=0 biosdevname=03 制作引导光盘和U盘
可以将定制安装光盘,并结合kickstart实现基于光盘启动的半自动化安装
第一步:把镜像光盘的isolinux目录下文件拷贝一份,和应答文件放在一个目录下
[root@centos7 ~]#mkdir /data/myiso -p
[root@centos7 ~]#mount /dev/sr0 /mnt/
mount: /dev/sr0 写保护,将以只读方式挂载
[root@centos7 ~]#cp -r /mnt/isolinux/ /data/myiso/
[root@centos7 ~]#cp /var/www/html/kickstart/ks.cfg /data/myiso/
[root@centos7 ~]#tree /data/
/data/
└── myiso
    ├── isolinux
    │   ├── boot.cat
    │   ├── boot.msg
    │   ├── grub.conf
    │   ├── initrd.img
    │   ├── isolinux.bin
    │   ├── isolinux.cfg
    │   ├── memtest
    │   ├── splash.png
    │   ├── TRANS.TBL
    │   ├── vesamenu.c32
    │   └── vmlinuz
    └── ks.cfg

2 directories, 12 files
第二步:修改目录下的isolinux.cfg文件,自定义安装系统内核参数
#方法1:应答方件放在ISO文件里
label linux
menu label ^Auto Install CentOS Linux 8
kernel vmlinuz
initrd=initrd.img text ks=cdrom:/myks.cfg #myks.cfg在/data/myiso/下
#方法2应答方件放在http服务器上
[root@centos7 ~]#cat /data/myiso/isolinux/isolinux.cfg
default vesamenu.c32
timeout 600
display boot.msg
# Clear the screen when exiting the menu, instead of leaving the menu displayed.
# For vesamenu, this means the graphical background is still displayed without
# the menu itself for as long as the screen remains in graphics mode.
menu clear
menu background splash.png
menu title CentOS 7
menu vshift 8
menu rows 18
menu margin 8
#menu hidden
menu helpmsgrow 15
menu tabmsgrow 13
# Border Area
menu color border * #00000000 #00000000 none
# Selected item
menu color sel 0 #ffffffff #00000000 none
# Title bar
menu color title 0 #ff7ba3d0 #00000000 none
# Press [Tab] message
menu color tabmsg 0 #ff3a6496 #00000000 none
# Unselected menu item
menu color unsel 0 #84b8ffff #00000000 none
# Selected hotkey
menu color hotsel 0 #84b8ffff #00000000 none
# Unselected hotkey
menu color hotkey 0 #ffffffff #00000000 none
# Help text
menu color help 0 #ffffffff #00000000 none
# A scrollbar of some type? Not sure.
menu color scrollbar 0 #ffffffff #ff355594 none
# Timeout msg
menu color timeout 0 #ffffffff #00000000 none
menu color timeout_msg 0 #ffffffff #00000000 none
# Command prompt text
menu color cmdmark 0 #84b8ffff #00000000 none
menu color cmdline 0 #ffffffff #00000000 none
# Do not display the actual menu unless the user presses a key. All that is displayed is a timeout message.
menu tabmsg Press Tab for full configuration options on menu items.
menu separator # insert an empty line
menu separator # insert an empty line
#修改内容如下,把其他label删除即可
label linux
menu label ^Auto Install CentOS 7
kernel vmlinuz
append initrd=initrd.img quiet ks=http://192.168.3.7/kickstart/ks.cfg net.ifnames=0 biosdevname=0
label rescue
menu label ^Rescue a CentOS system
kernel vmlinuz
append initrd=initrd.img quiet ks=http://192.168.3.7/kickstart/ks.cfg
cat
label local
menu label Boot from ^local drive
menu default
localboot 0xffff
[root@centos7 ~]#yum -y install mkisofs
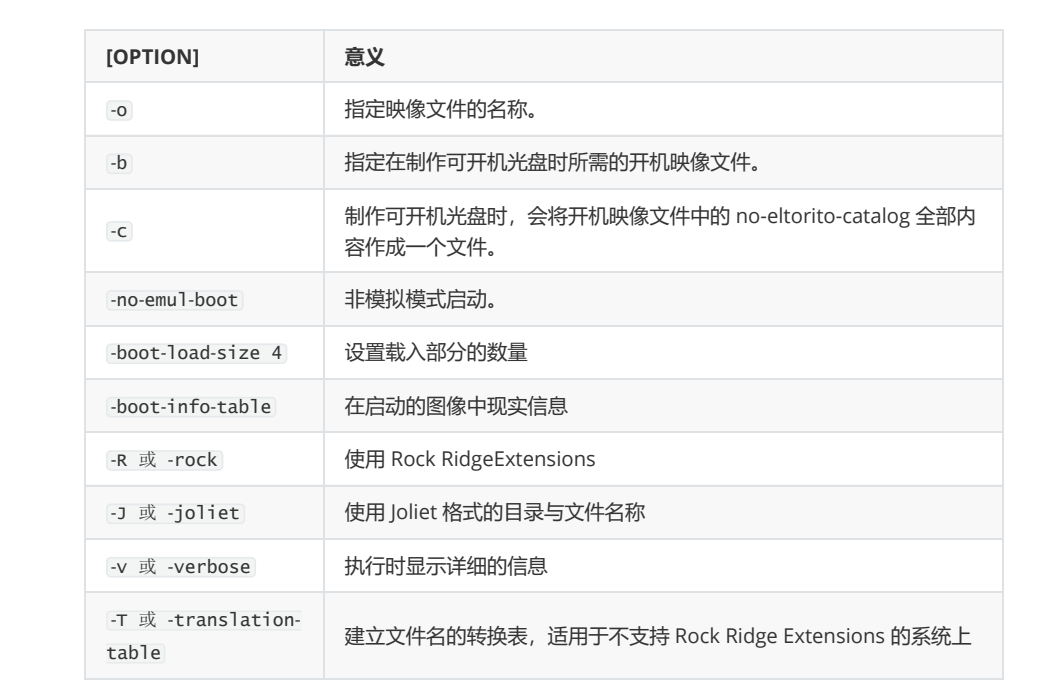
[root@centos7 ~]#mkisofs -R -J -T -v --no-emul-boot --boot-load-size 4 --boot-info-table -V "CentOS 7 x86_64 boot" -b isolinux/isolinux.bin -c isolinux/boot.cat -o /root/boot.iso /data/myiso/
#注意:以上相对路径都是相对于光盘的根,和工作目录无关
[root@centos7 ~]#ls
anaconda-ks.cfg boot.isomkisofs选项说明:
安装测试:
- 将 boot.iso 下载到windows系统下
- 新建一个系统,将boot.iso挂载上
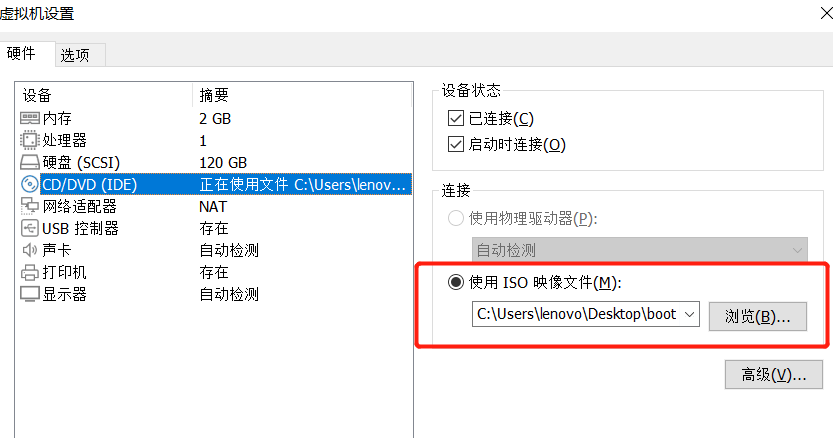
把制作的ISO光盘作为引导系统,选择安装即可
安装成功
报错说明:NO space left on device 内存不足
配置:应答方件放在ISO文件里
[root@centos7 ~]#cat /data/myiso/isolinux/isolinux.cfg
default vesamenu.c32
timeout 600

display boot.msg

# Clear the screen when exiting the menu, instead of leaving the menu displayed.
# For vesamenu, this means the graphical background is still displayed without
# the menu itself for as long as the screen remains in graphics mode.
menu clear
menu background splash.png
menu title CentOS 7
menu vshift 8
menu rows 18
menu margin 8
#menu hidden
menu helpmsgrow 15
menu tabmsgrow 13

# Border Area
menu color border * #00000000 #00000000 none

# Selected item
menu color sel 0 #ffffffff #00000000 none

# Title bar
menu color title 0 #ff7ba3d0 #00000000 none

# Press [Tab] message
menu color tabmsg 0 #ff3a6496 #00000000 none

# Unselected menu item
menu color unsel 0 #84b8ffff #00000000 none

# Selected hotkey
menu color hotsel 0 #84b8ffff #00000000 none

# Unselected hotkey
menu color hotkey 0 #ffffffff #00000000 none

# Help text
menu color help 0 #ffffffff #00000000 none

# A scrollbar of some type? Not sure.
menu color scrollbar 0 #ffffffff #ff355594 none

# Timeout msg
menu color timeout 0 #ffffffff #00000000 none
menu color timeout_msg 0 #ffffffff #00000000 none

# Command prompt text
menu color cmdmark 0 #84b8ffff #00000000 none
menu color cmdline 0 #ffffffff #00000000 none

# Do not display the actual menu unless the user presses a key. All that is displayed is a timeout message.

menu tabmsg Press Tab for full configuration options on menu items.

menu separator # insert an empty line
menu separator # insert an empty line

label linux
  menu label ^Auto Install CentOS 7
  kernel vmlinuz
  append initrd=initrd.img text ks=cdrom:/ks.cfg

#label rescue
#  menu label ^Rescue a CentOS system
#  kernel vmlinuz
#  append initrd=initrd.img text ks=cdrom:/ks.cfg

label local
  menu label Boot from ^local drive
  menu default
  localboot 0xffff

[root@centos7 ~]#ls /data/myiso/
isolinux  ks.cfg

[root@centos7 ~]#cat /data/myiso/ks.cfg
#platform=x86, AMD64, 或 Intel EM64T
#version=DEVEL
# Install OS instead of upgrade
install
# Keyboard layouts
keyboard 'us'
# Root password
rootpw --iscrypted $1$yfH5LeHA$VQxvkFT1zhFsnyVlXWoAE0
# System language
lang en_US
# System authorization information
auth  --useshadow  --passalgo=sha512
# Use text mode install
text
firstboot --disable
# SELinux configuration
selinux --disabled


# Firewall configuration
firewall --disabled
# Network information
network  --bootproto=dhcp --device=ens33  #网卡名字写ens33
#static --device=eth0 --gateway=192.168.3.1 --ip=192.168.3.88 --nameserver=233.5.5.5 --netmask=255.255.255.0
# Reboot after installation
reboot
# System timezone
timezone Asia/Shanghai
# Use network installation
url --url="http://192.168.3.7/centos"
# System bootloader configuration
bootloader --location=mbr
#--append="net.ifnames=0" --location=mbr
# Clear the Master Boot Record
zerombr
# Partition clearing information
clearpart --all --initlabel
# Disk partitioning information
part /boot --fstype="xfs" --size=1024
part / --fstype="xfs" --size=102400
part swap --fstype="xfs" --size=1024

%post --interpreter=bash
useradd zhou
echo 123456 | passwd --stdin zhou
mkdir /root/.ssh -m 700
cat > /root/.ssh/authorized_keys <<EOF
ssh-rsa AAAAB3NzaC1yc2EAAAADAQABAAABgQCbLa4m4FZZGuPX0CMhkTmQTfNSFjeZcbfvLl3KYI60zMmr4T8Us8u6pFgI5BqeoVpzdvKL4/O0qxfBnfdprPWP24JQMds9pYMl/fbyq42W9PjOclVaETzlHCuLuMuFX9910v5bsAxAID9ko4CuWm2WPQwXiSD8C+Z/sWbwiygZIq+H4zDQN6RwKI2pox7VnKiS3b0OPjW5gbJyBs+xXHrogW8GvM/YDkq9nJ7AkIHKWYFDMpkoS0RytU8YyQjZbwtj7K1JIvek/yMg6FpzhnQTnBmokdFfEVvY1/TK8foDBLOreYlT1fBYUa4bFozm5yfGuDG6pyZIKWjb6jz25E17zlgIiaFaFLytUQ/ACY6vvksp0ajR94upnaOwQa4avUV+skaZ5qJJCokuGCVIUx4RTR4KuQG8JyjhK/70q2qqeyTVXMvem7sw0bcRYKw2kJMo10Fpb/6tnuH53s2C4IXGnDHi2TitCYx5aF8C0S8xN0/mpJr7r6R5fAwaGOLoN7M= root@Rocky8
EOF
chmod 600 /root/.ssh/authorized_keys
%end

%packages
@ha
@web-server
-fence-agents-aliyun
-fence-agents-all
-fence-agents-aws
-fence-agents-azure-arm
-fence-agents-gce
-omping
-pacemaker-doc
-pcs

%end

[root@centos7 ~]#mkisofs -R -J -T -v --no-emul-boot --boot-load-size 4 --boot-info-table -V "CentOS 7 x86_64 boot" -b isolinux/isolinux.bin -c isolinux/boot.cat -o /root/boot.iso /data/myiso/

[root@centos7 ~]#ls
anaconda-ks.cfg  boot.iso

#把boot.iso下载到windows,进行安装测试
4 实现DHCP服务
主机获取IP地址可以通过俩种方式
静态获取:手动配置网卡的IP地址,网关,掩码,DNS
动态获取
bootp协议:boot protocol 是早期的IP地址动态获取协议,利用主机网卡MAC和IP地址绑定,引发问题是:某个IP地址只能分配绑定MAC地址的主机
dhcp协议:增强版的boot protocol ,支持静态分配和动态分配
4.1 DHCP工作原理
DHCP: Dynamic Host Configuration Protocol 动态主机配置协议,采用UDP协议,C/S模式
dhcp server:67/udp
dhcpv4 client:68/udp
dhcpv6 client:546/udp
主要用途:
用于内部网络和网络服务供应商自动分配IP地址给用户
用于内部网络管理员作为对所有电脑作集中管理的手段
自动化安装系统
解决IPV4资源不足问题
DHCP共有八种报文
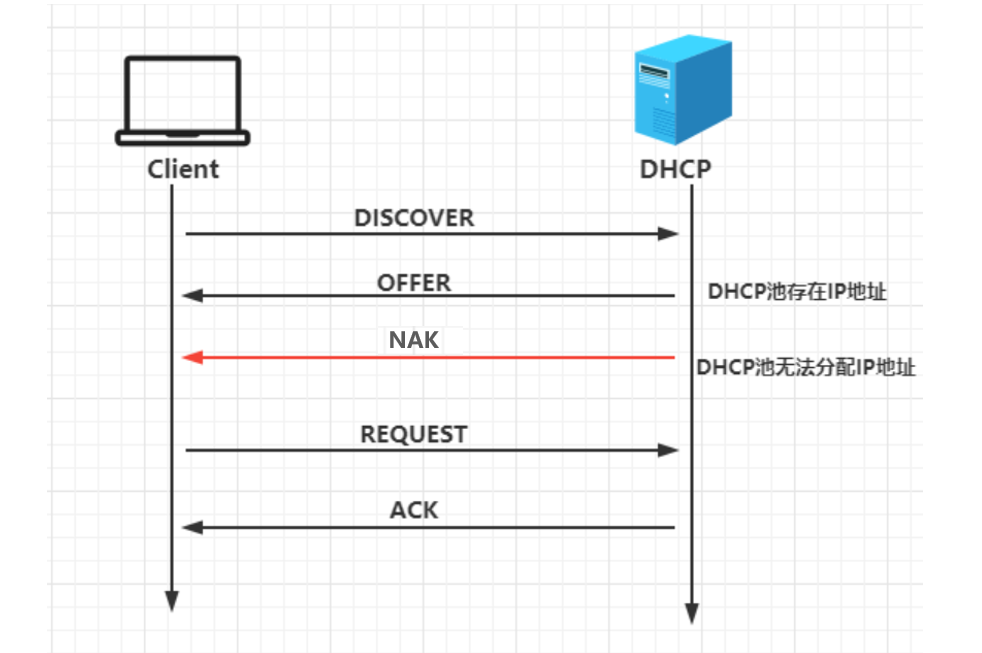
DHCP DISCOVER:客户端到服务端报文,客户端发送广播寻找DHCP服务器
DHCP OFFER:服务端到客户端报文,DHCP服务器接收客户端的广播请求,从DHCP地址池中取出IP地址并标记,向客户端确认是否接收该地址
DHCP REQUEST:客户端到服务端报文,客户端确认使用OFFER报文的IP地址
DHCP ACK:服务端到客户端报文:DHCP服务器正式把IP地址分配客户端
DHCP NAK:服务器到客户端,通知用户无法分配合适的IP地址
DHCP DECLINE :客户端到服务器,指示地址已被使用
DHCP RELEASE:客户端到服务器,放弃网络地址和取消剩余的租约时间
DHCP INFORM:客户端到服务器, 客户端如果需要从DHCP服务器端获取更为详细的配置信息,则发送Inform报文向服务器进行请求,极少用到
DHCP服务续租
50% :租赁时间达到50%时来续租,刚向DHCP服务器发向新的DHCPREQUEST请求。如果dhcp 服务没有拒绝的理由,则回应DHCPACK信息。当DHCP客户端收到该应答信息后,就重新开始新的租用周期
87.5%:如果之前DHCP Server没有回应续租请求,等到租约期的7/8时,主机会再发送一次广播 请求
租期
长租期:IP相对稳定,网络资源消耗较少,但是浪费IP资源
短租期:IP相对不稳定,网络资源消耗较多,但是IP资源可以充分利用,可以实现较少IP为较多的主机 服务
DHCP服务支持同网段和跨网段分配地址
客户端和DHCP服务器同网段:同网段下有多个dhcp服务器时,采用优先原则,先到先得。
客户端和DHCP服务器跨网段:
RFC 1542 Compliant Routers 专用路由器,只允许DHCP广播通过
DHCP AGENT 中继代理,接收到局域网的dhcp请求,通过单播方式向dhcp服务请求地址,一般路由器接口带有代理功能
通常情况下,为了保证dhcp服务器的冗余,采用路由器俩边搭建dhcp服务器,同一个IP地址段采用二八分配原则,即:路由器网段为W1和W2,W1网段设置200个dhcp池地址,其中W1的dhcp服务器设置160个地址,W2的dhcp服务器设置40个地址

4.2 DHCP实现
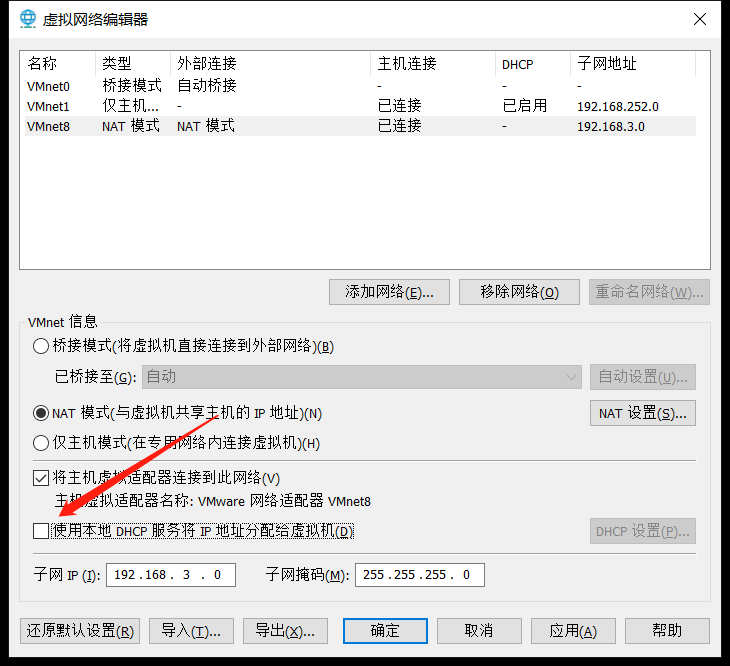
注意:实现DHCP服务前,先将网络已有DHCP服务,如:VMware中的DHCP关闭,防止冲突
DHCP服务的实现软件:
- dhcp(CentOS 7 之前版本) 或 dhcp-server(CentOS 8 中的包名)
- dnsmasq:小型服务软件,可以提供dhcp和dns功能
#### 4.2.1 DHCP相关文件组成
dhcp或dhcp-server 包文件组成
- /usr/sbin/dhcpd #dhcp服务主程序
- /etc/dhcp/dhcpd.conf #dhcp服务配置文件
- /usr/share/doc/dhcp-server/dhcpd.conf.example #dhcp服务配置范例文件
- /usr/lib/systemd/system/dhcpd.service #dhcp服务service文件
- /var/lib/dhcpd/dhcpd.leases #地址分配记录
dhcp-client客户端包
- /usr/sbin/dhclient #客户端程序
- /var/lib/dhclient #自动获取的IP信息
windows 工具
- ipconfig /release #释放DHCP获取的IP,重新申请IP
- ipconfig/renew #刷新租约,续约
#### 4.2.2 DHCP服务器配置文件
帮助参考:man 5 dhcpd.conf
/etc/dhcp/dhcpd.conf 格式
全局配置
subnet {
 ...
 }
host {
}
[root@centos7 ~]#yum install -y dhcp
[root@centos7 ~]#rpm -ql dhcp
[root@Rocky8 ~]# yum install -y dhcp-server
[root@Rocky8 ~]# rpm -ql dhcp-server
/etc/dhcp
/etc/dhcp/dhcpd.conf #ipv4配置文件
/etc/dhcp/dhcpd6.conf #ipv6配置文件
/usr/lib/systemd/system/dhcpd.service #Ipv4服务进程
/usr/lib/systemd/system/dhcpd6.service #IPV6服务进程
/usr/sbin/dhcpd
/usr/share/doc/dhcp-server/dhcpd.conf.example #配置文件范例
/usr/share/doc/dhcp-server/dhcpd6.conf.example
/var/lib/dhcpd
/var/lib/dhcpd/dhcpd.leases #dhcp数据库,存放了dhcp分配给客户端的IP地址信息
/var/lib/dhcpd/dhcpd6.leases4.3 DHCP配置
4.3.1 DHCP池配置
范例:dhcp服务配置说明
[root@Rocky8 ~]# systemctl restart dhcpd
Job for dhcpd.service failed because the control process exited with error code.
See "systemctl status dhcpd.service" and "journalctl -xe" for details.

[root@Rocky8 ~]# systemctl status dhcpd
● dhcpd.service - DHCPv4 Server Daemon
   Loaded: loaded (/usr/lib/systemd/system/dhcpd.service; disabled; vendor preset: disabled)
   Active: failed (Result: exit-code) since Sun 2022-08-28 04:21:20 CST; 2s ago
     Docs: man:dhcpd(8)
           man:dhcpd.conf(5)
  Process: 1575 ExecStart=/usr/sbin/dhcpd -f -cf /etc/dhcp/dhcpd.conf -user dhcpd -group dhcpd --n>
 Main PID: 1575 (code=exited, status=1/FAILURE)

8月 28 04:21:20 Rocky8 dhcpd[1575]: have been made to the base software release in order to make
8月 28 04:21:20 Rocky8 dhcpd[1575]: it work better with this distribution.
8月 28 04:21:20 Rocky8 dhcpd[1575]:
8月 28 04:21:20 Rocky8 dhcpd[1575]: Please report issues with this software via:
8月 28 04:21:20 Rocky8 dhcpd[1575]: https://bugs.rockylinux.org/
8月 28 04:21:20 Rocky8 dhcpd[1575]:
8月 28 04:21:20 Rocky8 dhcpd[1575]: exiting.
8月 28 04:21:20 Rocky8 systemd[1]: dhcpd.service: Main process exited, code=exited, status=1/FAILU>
8月 28 04:21:20 Rocky8 systemd[1]: dhcpd.service: Failed with result 'exit-code'.
8月 28 04:21:20 Rocky8 systemd[1]: Failed to start DHCPv4 Server Daemon.

[root@Rocky8 ~]# ll /usr/share/doc/dhcp-server/dhcpd.conf.example
-rw-r--r-- 1 root root 3266 7月  25 2017 /usr/share/doc/dhcp-server/dhcpd.conf.example

[root@Rocky8 ~]# \cp /usr/share/doc/dhcp-server/dhcpd.conf.example /etc/dhcp/dhcpd.conf

[root@Rocky8 ~]# vim /etc/dhcp/dhcpd.conf
#定义客户端域,即:ping www 自动加其后缀
option domain-name "baidu.com";
#定义分配客户端的DNS地址,以逗号隔开
option domain-name-servers 8.8.8.8,114.114.114.114;
#dhcp服务租期时间,到达时间客户端需要续租
default-lease-time 86400;
#dhcp允许最大租期
max-lease-time 604800;
#定义dhcp地址池:subnet <网段> netmask <掩码>
subnet 10.0.0.0 netmask 255.255.255.0 {
  #地址池地址
  range 10.0.0.100 10.0.0.200;
  #网关地址
  option routers 10.0.0.1;
}

[root@Rocky8 ~]# systemctl enable --now dhcpd
Created symlink /etc/systemd/system/multi-user.target.wants/dhcpd.service → /usr/lib/systemd/system/dhcpd.service.

[root@Rocky8 ~]# systemctl status dhcpd
● dhcpd.service - DHCPv4 Server Daemon
   Loaded: loaded (/usr/lib/systemd/system/dhcpd.service; enabled; vendor preset: disabled)
   Active: active (running) since Sun 2022-08-28 04:28:14 CST; 5s ago

[root@Rocky8 ~]# ss -ntlu
Netid    State     Recv-Q    Send-Q       Local Address:Port       Peer Address:Port    Process
udp      UNCONN    0         0                  0.0.0.0:67              0.0.0.0:*

[root@Rocky8 ~]# dnf install lsof -y

[root@Rocky8 ~]# lsof -i:67
COMMAND  PID  USER   FD   TYPE DEVICE SIZE/OFF NODE NAME
dhcpd   1605 dhcpd   10u  IPv4  31633      0t0  UDP *:bootps
客户端向dhcp服务器申请地址有两个方式:
dhclient命令开启dhcp客户端,默认后台运行;dhclient -d 前台显示运行信息
网卡配置文件设置dhcp获取地址,重启网卡服务会自动运行dhclient进程
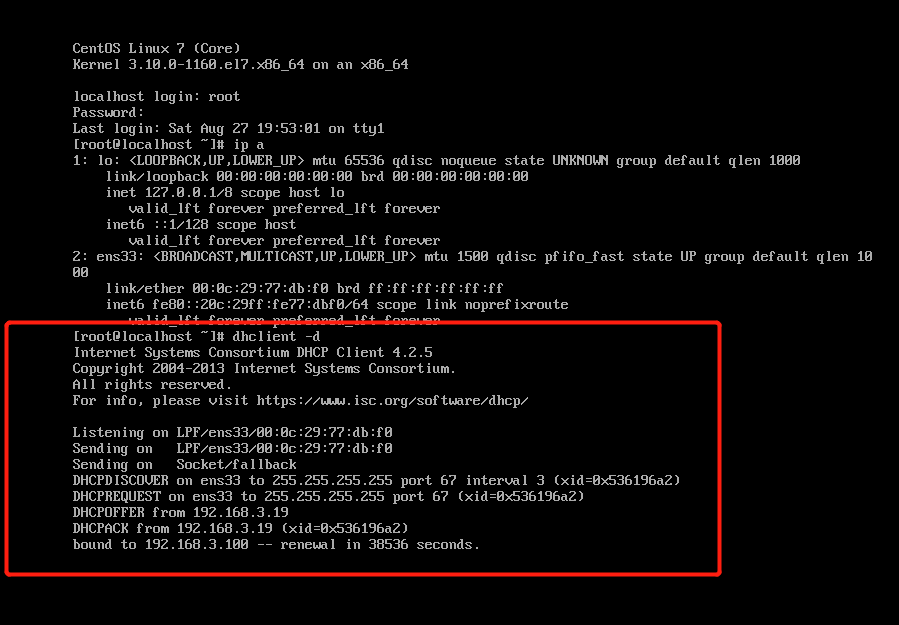
在VM中按 alt+F2 再打开一个终端,查看IP
[root@centos7 ~ ]# dhclient -d
Internet Systems Consortium DHCP Client 4.2.5
Copyright 2004-2013 Internet Systems Consortium.
All rights reserved.
For info, please visit https://www.isc.org/software/dhcp/

Listening on LPF/eth0/00:0c:29:22:3d:19
Sending on   LPF/eth0/00:0c:29:22:3d:19
Sending on   Socket/fallback
DHCPDISCOVER on eth0 to 255.255.255.255 port 67 interval 6 (xid=0x5f215f31)
DHCPREQUEST on eth0 to 255.255.255.255 port 67 (xid=0x5f215f31)
DHCPOFFER from 10.0.0.8
DHCPACK from 10.0.0.8 (xid=0x5f215f31)
bound to 10.0.0.100 -- renewal in 37088 seconds.	#dhcp分配的地址是租期时间的一半
客户端申请到地址,记录在 /var/lib/dhclient/dhclient.leases文件
[root@centos7 ~ ]# cat /var/lib/dhclient/dhclient.leases
lease {
  interface "eth0";					#地址绑定在本地主机的网卡名
  fixed-address 10.0.0.100;			 #申请到IP地址
  option subnet-mask 255.255.255.0;   #掩码
  option routers 10.0.0.1;            #网关
  option dhcp-lease-time 86400;		  #租期时间
  option dhcp-message-type 5;
  option domain-name-servers 233.5.5.5,114.114.114.114;	#DNS地址
  option dhcp-server-identifier 10.0.0.8;	#dhcp服务器地址
  option domain-name "ops.org";		#域
  renew 2 2021/07/13 12:43:27;		#申请时间,以UTC时间
  #注意:这里的时间都是utc时间,比如我们是15:00获取的ip 配置文件里显示的是07:00,比北京时间少8小时
  rebind 2 2021/07/13 23:25:17;		#结束时间
  expire 3 2021/07/14 02:25:17;
}
4.3.2 DHCP静态分配
配置示例:给固定主机分配固定地址
[root@Rocky8 ~ ]# egrep -v "^#|^$" /etc/dhcp/dhcpd.conf
#dhcp通用配置
option domain-name "baidu.com";
option domain-name-servers 233.5.5.5,114.114.114.114;
default-lease-time 86400;
max-lease-time 106400;
log-facility local7;

#针对网段设置配置
subnet 10.0.0.0 netmask 255.255.255.0 {
  range 10.0.0.100 10.0.0.120;		#设置俩个地址池
  range 10.0.0.180 10.0.0.200;
  option routers 10.0.0.1;
  option domain-name "baidu.com";
  option domain-name-servers 233.5.5.5;
  default-lease-time 600;
  max-lease-time 7200;
}

#host 针对固定主机分配固定地址
host centos7 {
 hardware ethernet 00:0c:29:22:3d:19;		#客户端网卡的mac地址
 fixed-address 10.0.0.222;
 default-lease-time 86400;
 max-lease-time 864000;
 option routers 10.0.0.1;
 option domain-name-servers 114.114.114.114;
 option domain-name "baidu.com";
}

[root@Rocky8 ~]# systemctl restart dhcpd

#分别开两台机器测试,一个绑定了MAC地址一个不绑定
DHCP服务器的日志
[root@Rocky8 ~]# cat /var/lib/dhcpd/dhcpd.leases4.3.3 DHCP的PXE配置
利用PXE实现自动化安装系统,PXE客户端安装启动需要dhcp服务器申请地址,同时dhcp服务器需要告知客户端TFTP服务器地址和启动文件
配置如下参数
next-server:提供引导文件的TFTP服务器地址
filename:引导文件名称
x subnet 10.0.0.0 netmask 255.255.255.0 { range 10.0.0.100 10.0.0.200; option routers 10.0.0.1; option domain-name "baidu.com"; option domain-name-servers 233.5.5.5; default-lease-time 600; max-lease-time 7200; next-server 10.0.0.8; #TFTP服务器地址 filename "pxelinux.0"; #bootloader启动文件的名称}5 实现TFTP服务
5.1 TFTP服务介绍
TFTP:Trivial File Transfer Protocol ,是一种用于传输文件的简单高级协议,是文件传输协议(FTP)的简化版本。用来传输比文件传输协议(FTP)更易于使用但功能较少的文件,属于非独立服务
TFTP和FTP的区别:
安全性区别
FTP支持登录安全,具有适当的身份验证和加密协议,在建立连接期间需要与FTP身份验证通信
TFTP是一种开放协议,缺乏安全性,没有加密机制,与TFTP通信时不需要认证
传输层协议的区别
FTP使用TCP作为传输层协议,TFTP使用UDP作为传输层协议
使用端口的区别
FTP使用2个端口:TCP端口21,是个侦听端口;TCP端口20或更高TCP端口1024以上用于源连接
TFTP仅使用一个具有停止和等待模式的端口:端口:69/udp
RFC的区别
FTP是基于RFC 959文档,带有其他RFC涵盖安全措施;TFTP基于RFC 1350文档
执行命令的区别
FTP有许多可以执行的命令(get,put,ls,dir,lcd)并且可以列出目录等
TFTP只有5个指令可以执行(rrq,wrq,data,ack,error)
5.2 安装和使用TFTP
安装包:
tftp-server #服务器包
tftp #客户端包
范例:安装并使用tftp下载文件
[root@Rocky8 ~]# yum install -y tftp-server
[root@Rocky8 ~]# rpm -ql tftp-server
/usr/lib/.build-id
/usr/lib/.build-id/8c
/usr/lib/.build-id/8c/6921a9fb21d66da4fb299d516bce9ee6afea34
/usr/lib/systemd/system/tftp.service #tftp service文件
/usr/lib/systemd/system/tftp.socket #tftp socket文件
/usr/sbin/in.tftpd   #tftp主程序
/usr/share/doc/tftp-server
/usr/share/doc/tftp-server/CHANGES
/usr/share/doc/tftp-server/README
/usr/share/doc/tftp-server/README.security
/usr/share/man/man8/in.tftpd.8.gz
/usr/share/man/man8/tftpd.8.gz
/var/lib/tftpboot   #TFTP服务数据目录

[root@Rocky8 ~]# systemctl enable --now tftp.service
Created symlink /etc/systemd/system/sockets.target.wants/tftp.socket → /usr/lib/systemd/system/tftp.socket.

[root@Rocky8 ~]# netstat -tulnp | grep 69
udp6       0      0 :::69                   :::*                                1/systemd

#准备测试文件
[root@Rocky8 ~]# cp /etc/fstab /var/lib/tftpboot/
[root@Rocky8 ~]# cp /etc/hostname /var/lib/tftpboot/
[root@Rocky8 ~]# ls /var/lib/tftpboot/
fstab  hostname

[root@Rocky8 ~]# mkdir /var/lib/tftpboot/dir
[root@Rocky8 ~]# cp /etc/passwd /var/lib/tftpboot/dir/f2.txt
客户端部署并使用
[root@centos7 ~]#yum install -y tftp

#客户端通过tftp测试下载文件
[root@centos7 ~]#tftp 192.168.3.19
tftp> help
tftp> help
tftp-hpa 5.2
Commands may be abbreviated.  Commands are:

connect 	connect to remote tftp
mode    	set file transfer mode
put     	send file
get     	receive file
quit    	exit tftp
verbose 	toggle verbose mode
trace   	toggle packet tracing
literal 	toggle literal mode, ignore ':' in file name
status  	show current status
binary  	set mode to octet
ascii   	set mode to netascii
rexmt   	set per-packet transmission timeout
timeout 	set total retransmission timeout
?       	print help information
help    	print help information

tftp> get fstab
tftp> get dir/f1
tftp> quit

[root@centos7 ~]#ls
f2.txt  fstab

#以下在tftp服务器执行,当用户下载文件后,可以观察到服务器端自动打开in.tftpd主程序
[root@Rocky8 tftpboot]#ps aux|grep in.tftp
root       1276  0.0  0.2  14912  1720 ?       Ss   12:03   0:00
/usr/sbin/in.tftpd -s /var/lib/tftpboot
root       1282  0.0  0.1  12108   960 pts/0   R+   12:04   0:00 grep --
color=auto in.tftp
6 利用 PXE 实现自动化系统部署

6.1 PXE介绍
PXE:Preboot Excution Environment,预启动执行环境,是由Intel公司研发,基于Client/Server的网络模式,支持远程主机通过网络从远端服务器下载映像,并由此支持通过网络启动操作系统,可以引导和安装Windows,Linux等多种操作系统。
PXE启动工作原理
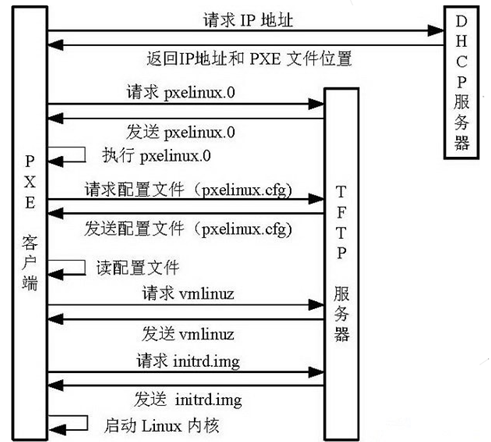
6.2 利用PXE实现自动化安装流程
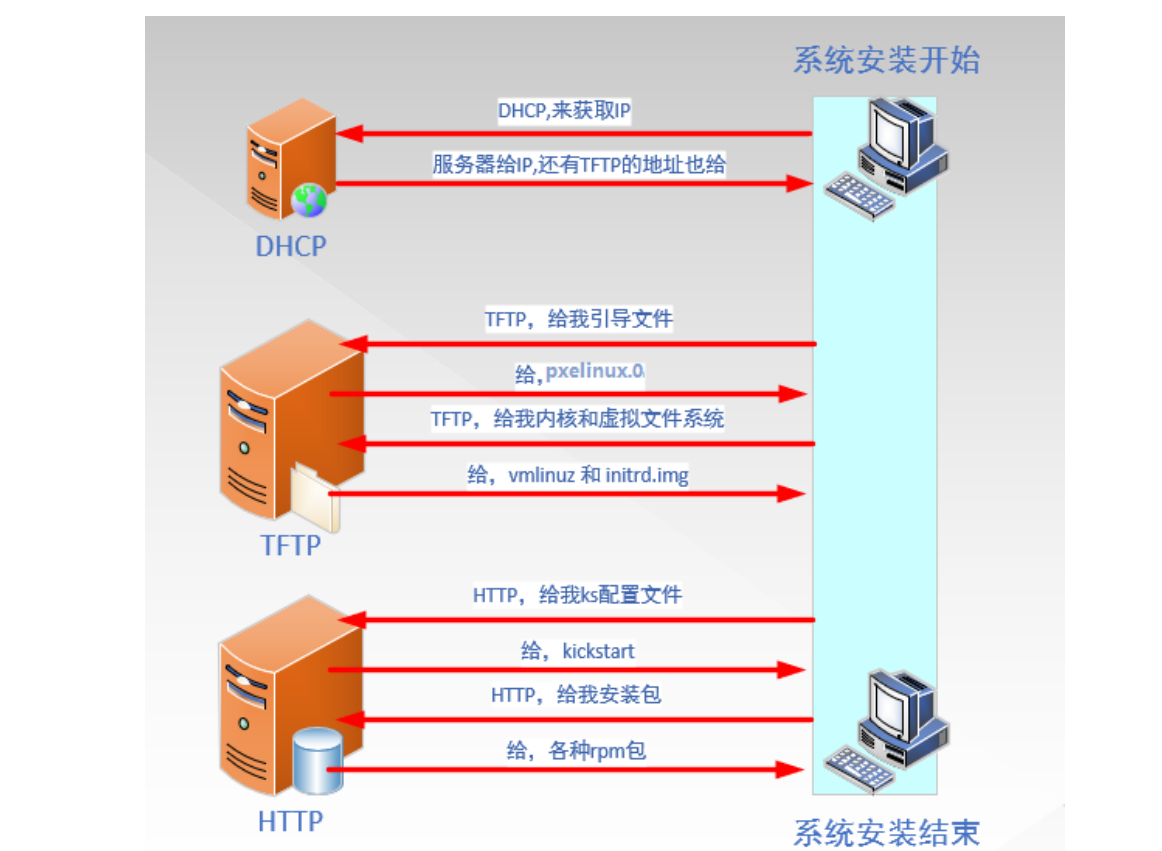
Clie Client
Client通过得到IP地址向TFTP服务发送获取pxelinux.0 文件的请求,TFTP服务器响应给pxelinux.0 文件大小,试探Client是否满意接收;当TFTP接收到Client同意接收该pxelinux.0 文件的请求之后,正式向Client发送pxelinux.0文件
Client接收到TFTP发来的pxelinux.0文件,利用该文件启动引导(相当于boot loaber 的第一阶段)
启动成功后,Client向TFTP服务器发送获取对于本机的配置文件pxelinux.cfg,收到CLient确认接收,TFTP服务器将启动菜单配置文件发回Client
Client读取TFTP发来配置文件pxelinux.cfg (相当于boot loaber的第二阶段选择菜单)
Client根据启动菜单配置文件里的信息,向TFTP发送Linux内核和initrd文件请求信息,TFTP接收到消息之后将内核和initrd文件发送给Client
Client向TFTP发送根文件请求信息,TFTP接收到消息之后返回Linux根文件系统
Client启动Linux内核,加载相关的内核参数
Client通过内核参数下载kickstart文件,并根据kickstart文件里的安装信息,下载安装源文件进行自动化安装
针对uefi引导的客户端配置
6.3 实现PXE自动化安装CentOS6、7、8
6.3.1 安装前准备
关闭PXE服务端的防火墙 和 selinux,设置静态获取地址,关闭Vmware软件中的DHCP服务,基于NAT模式.
6.3.2 安装所需软件并启动服务
[root@Rocky8 ~]# yum install -y tree dhcp-server tftp-server httpd syslinux-nonlinux vim
[root@Rocky8 ~]# systemctl enable --now httpd tftp.socket
Created symlink /etc/systemd/system/multi-user.target.wants/httpd.service → /usr/lib/systemd/system/httpd.service.6.3.4 配置DHCP服务
[root@Rocky8 ~]# vim /etc/dhcp/dhcpd.conf
option domain-name "baidu.com";
option domain-name-servers 233.5.5.5,114.114.114.114;
default-lease-time 86400;
max-lease-time 106400;
log-facility local7;
subnet 10.0.0.0 netmask 255.255.255.0 {
range 10.0.0.100 10.0.0.200;
option routers 10.0.0.1;
next-server 10.0.0.9;
filename "pxelinux.0";
}
[root@Rocky8 ~]# systemctl enable --now dhcpd
Created symlink /etc/systemd/system/multi-user.target.wants/dhcpd.service → /usr/lib/systemd/system/dhcpd.service.6.3.5 准备安装系统yum仓库
[root@Rocky8 ~]# mkdir -pv /var/www/html/centos{6,7,8}
mkdir: 已创建目录 '/var/www/html/centos6'
mkdir: 已创建目录 '/var/www/html/centos7'
mkdir: 已创建目录 '/var/www/html/centos8'
[root@Rocky8 ~]# mkdir /var/www/html/ks
[root@Rocky8 ~]# init 0[root@Rocky8 ~]# echo "- - -">>/sys/class/scsi_host/host0/scan
[root@Rocky8 ~]# echo "- - -">>/sys/class/scsi_host/host1/scan
[root@Rocky8 ~]# echo "- - -">>/sys/class/scsi_host/host2/scan
[root@Rocky8 ~]# mount /dev/sr0 /var/www/html/centos8/
[root@Rocky8 ~]# mount /dev/sr2 /var/www/html/centos7
[root@Rocky8 ~]# mount /dev/sr1 /var/www/html/centos6
[root@Rocky8 ~]# df -h | grep ^/dev/sr*
/dev/sr0 11G 11G 0 100% /var/www/html/centos8
/dev/sr2 4.4G 4.4G 0 100% /var/www/html/centos7
/dev/sr1 3.8G 3.8G 0 100% /var/www/html/centos66.3.6 准备kickstart应答文件
[root@centos8 ~ ]# cat /var/www/html/ks/centos6-ks.cfg
install
text
reboot
lang en_US.UTF-8
keyboard us
rootpw --plaintext 123456
firewall --disabled
authconfig --enableshadow --passalgo=sha512
selinux --disabled
timezone Asia/Shanghai
bootloader --location=mbr --driveorder=sda --append="crashkernel=auto rhgb quiet"
network --bootproto=static --device=eth0 --gateway=10.0.0.1 --ip=10.0.0.106 --nameserver=233.5.5.5 --netmask=255.255.255.0 --ipv6=auto --activate
network --hostname=centos6
url --url=http://10.0.0.9/centos6/
zerombr
clearpart --all --initlabel
part /boot --fstype=ext4 --size=1024
part / --fstype=ext4 --size=20480
part /data --fstype=ext4 --size=2048
part swap --size=2048
%packages
@core
@server-policy
@workstation-policy
autofs
vim-enhanced
%end
%post
useradd zhou
echo 123456 | passwd --stdin zhou &> /dev/null
%end[root@centos8 ~ ]# cat /var/www/html/ks/centos7-ks.cfg
install
keyboard 'us'
rootpw --plaintext 123456
lang en_US
auth --useshadow --passalgo=sha512
text
firstboot --disable
selinux --disabled
firewall --disabled
reboot
network --bootproto=static --device=eth0 --gateway=10.0.0.1 --ip=10.0.0.107 --nameserver=223.5.5.5 --netmask=255.255.255.0
network --hostname=centos7
timezone Asia/Shanghai --isUt
url --url="http://10.0.0.9/centos7"
bootloader --location=mbr
zerombr
clearpart --all --initlabel
part /boot --fstype="xfs" --size=1024
part swap --fstype="swap" --size=1024
part / --fstype="xfs" --size=10240
%post --interpreter=bash
useradd zhou
echo 123456|passwd --stdin zhou
%end
%packages
@^minimal
@core
%end[root@centos8 ~ ]# cat /var/www/html/ks/centos8-ks.cfg
ignoredisk --only-use=sda
zerombr
text
reboot
selinux --disabled
firewall --disabled
keyboard --vckeymap=us --xlayouts='us'
lang en_US.UTF-8
rootpw --plaintext 123456
firstboot --enable
skipx
timezone Asia/Shanghai --isUtc --nontp
network --bootproto=static --device=eth0 --gateway=10.0.0.1 --ip=10.0.0.108 --nameserver=233.5.5.5 --netmask=255.255.255.0 --ipv6=auto --activate
network --hostname=centos8
url --url=http://10.0.0.9/centos8/
clearpart --all --initlabel
part / --fstype="xfs" --ondisk=sda --size=10240
part /data --fstype="xfs" --ondisk=sda --size=2048
part swap --fstype="swap" --ondisk=sda --size=2048
part /boot --fstype="ext4" --ondisk=sda --size=1024
services --disabled="chronyd"
%packages
@^minimal-environment
kexec-tools
%end
%addon com_redhat_kdump --enable --reserve-mb='auto'
%end
%anaconda
pwpolicy root --minlen=6 --minquality=1 --notstrict --nochanges --notempty
pwpolicy user --minlen=6 --minquality=1 --notstrict --nochanges --emptyok
pwpolicy luks --minlen=6 --minquality=1 --notstrict --nochanges --notempty
%end
%post
useradd zhou
echo 123456 | passwd --stdin zhou &> /dev/null
%end6.3.7 准备PXE启动文件
#拷贝centos6,7,8系统内核文件到tftp数据目录
[root@Rocky8 ~]# mkdir -pv /var/lib/tftpboot/centos{6..8}
[root@Rocky8 ~]# cp /var/www/html/centos6/isolinux/{vmlinuz,initrd.img} /var/lib/tftpboot/centos6/
[root@Rocky8 ~]# cp /var/www/html/centos7/isolinux/{vmlinuz,initrd.img} /var/lib/tftpboot/centos7/
[root@Rocky8 ~]# cp /var/www/html/centos8/isolinux/{vmlinuz,initrd.img} /var/lib/tftpboot/centos8/
[root@Rocky8 ~]# ll /var/lib/tftpboot/
总用量 0
drwxr-xr-x 2 root root 39 8月 28 06:13 centos6
drwxr-xr-x 2 root root 39 8月 28 06:13 centos7
drwxr-xr-x 2 root root 39 8月 28 06:13 centos8
#拷贝 syslinux-nonlinux 软件包的pxelinux.0 启动文件和 menu.c32 pxe菜单文件
[root@Rocky8 ~]# cp /usr/share/syslinux/{pxelinux.0,menu.c32} /var/lib/tftpboot/
#以下三个文件是CentOS8安装所必须文件,CentOS6,7则不需要
[root@Rocky8 ~]# cp /var/www/html/centos8/isolinux/{ldlinux.c32,libcom32.c32,libutil.c32} /var/lib/tftpboot/
#生成内核启动菜单文件
[root@Rocky8 ~]# mkdir /var/lib/tftpboot/pxelinux.cfg
[root@Rocky8 ~]# cp /var/www/html/centos8/isolinux/isolinux.cfg /var/lib/tftpboot/pxelinux.cfg/default
[root@Rocky8 ~]# tree /var/lib/tftpboot/
/var/lib/tftpboot/
├── centos6
│ ├── initrd.img
│ └── vmlinuz
├── centos7
│ ├── initrd.img
│ └── vmlinuz
├── centos8
│ ├── initrd.img
│ └── vmlinuz
├── ldlinux.c32
├── libcom32.c32
├── libutil.c32
├── menu.c32
├── pxelinux.0
└── pxelinux.cfg
└── default
4 directories, 12 files6.3.8 定制内核启动菜单文件
[root@Rocky8 ~]# vim /var/lib/tftpboot/pxelinux.cfg/default
default menu.c32
timeout 600
menu title PXE Install CentOS Linux
label linux8
menu label Auto Install CentOS ^8
kernel centos8/vmlinuz
append initrd=centos8/initrd.img quiet inst.ks=http://10.0.0.9/ks/centos8-ks.cfg net.ifnames=0 biosdevname=0
label linux7
menu label Auto Install CentOS ^7
kernel centos7/vmlinuz
append initrd=centos7/initrd.img quiet ks=http://10.0.0.9/ks/centos7-ks.cfg net.ifnames=0 biosdevname=0
label linux6
menu label Auto Install CentOS ^6
kernel centos6/vmlinuz
append initrd=centos6/initrd.img quiet ks=http://10.0.0.9/ks/centos6-ks.cfg net.ifnames=0 biosdevname=0
label rescue
menu label ^Rescue a CentOS system
kernel centos8/vmlinuz
append initrd=centos8/initrd.img quiet ks=http://10.0.0.9/ks/centos8-ks.cfg
label local
menu default
menu label Boot from ^local drive
localboot 0xffff6.3.9 测试客户端基于PXE实现自动安装
新准备一台主机,设置网卡引导,可看到看启动菜单,并实现自动安装
注意:VMware workstation 对于不同的CentOS 版本,生成的虚拟机的硬件并不兼容
[root@Rocky8 ~]# vim /var/lib/tftpboot/pxelinux.cfg/default
#增添以下内容
label manual
 menu label ^Manual Install CentOS Linux 8.0
 kernel centos8/vmlinuz
 append initrd=centos8/initrd.img inst.repo=http://10.0.0.100/centos8